![]()
![]()
(Topic Last Updated On: 05/24/2018)
Pharmacy > Dose Patient
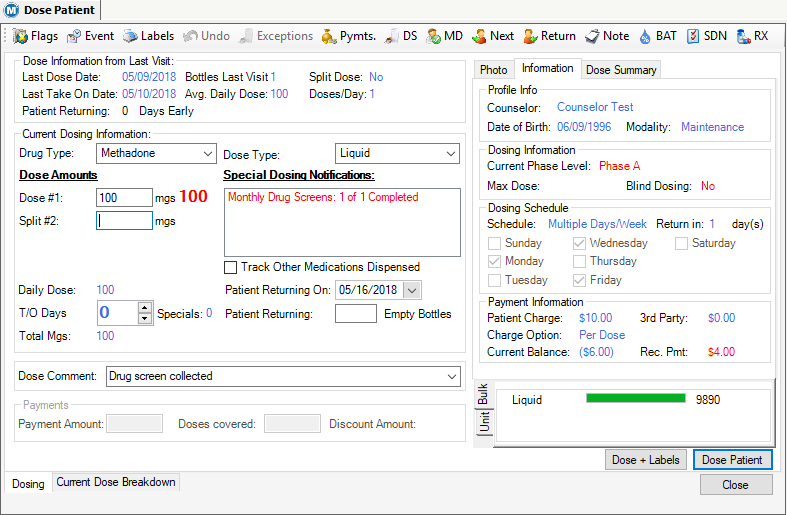
The Dose Patient menu item, found on the Pharmacy menu, launches the Dose Patient screen. This screen is also accessible by clicking on the 'Dosing' shortcut button in the shortcuts toolbar or by retrieving a patient from the 'Dosing Queue'. This screen is primarily used to dispense medications and record patient dosing activity in the system. This screen provides numerous options for recording additional information, including a Dose Comment and the number of Empty Bottles returned to the clinic. The Exceptions button allows users to accommodate numerous unusual dosing scenarios, including dosing patients who have returned to the clinic early to pick up additional takeouts, replacing doses, and dispensing additional doses for the same date. The Photo, Information, and Dose Summary tabs provide convenient access to important patient information, as well as a summary of what the user is about to dispense to the patient. The Exception Summary tab appears for any patient returning early to the clinic, summarizing early return details. Special Dosing Notifications are customizable for each patient, and can provide important information specific to each patient when they are retrieved for dosing. Open Inventory Levels are displayed for each Drug and Dose type combination a patient is taking, and additional medication dispensing can be tracked for each patient using the Other Medications functionality. Shortcut buttons along the top of this screen provide easy access to other functions in the system related to dosing, such as, Patient Flags, Prescription Information, and Orders.
Last Dose Date
The date displayed here is the last date on which the patient attended the clinic and received a dose.
Bottles Last Visit
The number displayed here is the number of takeout bottles the patient left the clinic with on their Last Dose Date.
Split Dose
'Yes' or 'No' is displayed here indicating whether or not the patient is a split-doser. Setting a patient to receive split dose amounts is done on the 'Dosing Information' screen.
Last Take On Date
The date displayed here is the last date for which the patient has medication.
Avg. Daily Dose
The dose amount displayed here is the average dose amount the patient received the last time he received medication.
Doses/Day
The number of doses displayed here is the number of doses per day that the patient was given on the Last Dose Date.
Patient Returning _____ Days Early
If a patient returns to the clinic prior to their scheduled Return Date, the number of Days Early they have returned, will display here.
Drug Type
The Drug type the patient is being medicated with is displayed here.
Dose Type
The Dose type the patient is being medicated with is displayed here.
Dose #1 (mgs)
For patients taking only one dose daily, this field displays the patient's current primary daily dose amount. For split-dose patients, this field displays the amount of medication that will be dispensed at the window for their first dose.
Split #2 - Split #4 (mgs)
These fields will remain empty for patients taking one dose daily. For split-dose patients, these fields display the amount of medication that will be dispensed for their 2nd and any other split dose(s). Split doses are generally carried out and ingested outside of the clinic. Methasoft accommodates up to 4 daily splits, configurable in Pharmacy Preferences.
Daily Dose
This amount is the total number of milligrams (mg) the patient is dispensed daily. For Split-dosing patients, this field adds all split doses together giving a daily dose total.
T/O Days
The number displayed here is the number of days for which the patient will receive takeout doses.
Specials
The number displayed here indicates the number of 'T/O Days' considered as 'Special'. Special takeouts are takeouts granted to a patient above and beyond what they normally are eligible to receive. Special takeouts are assigned using a 'Specials Takeouts' order.
Total Mgs.
This amount is the total number of milligrams about to be dispensed to the patient, including any split and/or takeout doses.
Special Dosing Notifications
This field contains messages that are either saved for the patient as Special Dosing Messages in Dosing Information (up to 2 per patient can be saved), or are generated automatically by the system when applicable. System-generated messages include notice that an order has been processed, the patient's progress toward monthly drug screen requirements, the next upcoming dose change for a patient on a Titrate/Detox schedule, and warnings for clinics dispensing without the use of an automated dispensing pump in the case where multiple dose amounts are being dispensed to the patient.
Track Other Medications Dispensed
If other medications are being tracked for the selected patient, this checkbox will be checked by default. This will prompt the system to bring up the 'Select Other Medications to Dispense' window. From this application window the user can select additional medications to be dispensed, before proceeding further with the dosing transaction.
Patient Returning On
The date displayed here is the date on which the patient is scheduled to return to the clinic following today's dose.
Patient Returning _____ Empty Bottles
For clinics tracking the return of empty takeout bottles brought back to the clinic, users enter the number of empty bottles being returned here, prior to completing the dose transaction.
Administered By
This field only appears if the Pharmacy Preference is turned on. This feature is used in facilities with multiple staff members dispensing from the same workstation. When this functionality is turned on, a selection is required in this field for each dosing transaction recorded.
Dose Comment
This field is used to document a comment tied only to this dosing transaction. Generally this is used to note that a Random Drug Screen was collected, or why the patient's dose amount or takeout days were adjusted on this screen to accommodate unusual circumstances. This field contains a drop-down list of preselected, commonly-used comments that are customizable in the Dose Comment Code Table Type. Free-text entries are also accepted, and all Dose Comments will appear on the Total Dispensed by Day, Patient Medication Record reports, as well as under the 'Comment' column on the patient's Dosing History.
Payment Amount
This field is only enabled if the corresponding Accounting Preference is set for the clinic to accept payments at the dosing window. When enabled, the amount of the payment being made by the patient is entered here.
Doses Covered
This field is only enabled if the corresponding Accounting Preference is set for the clinic to accept payments at the dosing window. This field is only useful in clinics charging patients on the Per Dose option. When a Payment Amount is entered, the system calculates how many doses are covered based on the dosing Billable Services relating to the patient's Billing Episode. Overriding this number to a larger number will cause the system to calculate a Discount Amount being credited to the patient's account. This field is most commonly used in clinics where dosing discounts are offered for pre-payment for a full week or month of treatment, or in some clinics, for married couples.
Discount Amount
This field is only enabled if the corresponding Accounting Preference is set for the clinic to accept payments at the dosing window. This field is only useful in clinics charging patients on the Per Dose option. If users override the number of Doses Covered to a larger number than appears by default, a discount amount will be calculated and will appear in this field. The amount that appears is based on the Payment Amount and Doses Covered entered, along with the Billable Services configured for the patient's Billing Episode.
Open Inventory Levels
This field contains 'Bulk' and 'Unit' inventory levels. When a patient is retrieved on the Dose Patient screen, up to 3 Open Inventory gauges will appear in the 'Bulk' section, indicating the current bottle volume for each open bottle on the workstation, for the Drug and Dose type combination the patient is taking. The green gauge provides a visual cue as to how much medication remains in the bottle, and the remaining amount of milligrams is displayed to the right of each gauge. Under the 'Unit' tab is displayed the number of units available as takeout units for the selected patient.
Photo
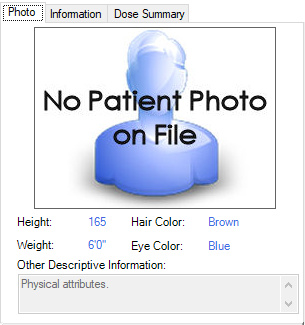
This tab displays the patient's photo and physical description, including 'Other Descriptive Information' as saved for the patient on the Patient Profile screen.
Information
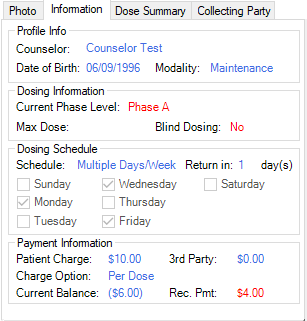
This tab is selected by default when the Dose Patient screen is opened or refreshed, and a patient is selected. This tab provides various information on the patient, which can be useful in different clinics depending on the clinic's policy and procedure. Clicking on this tab displays the counselor managing the patient and a current summary of the patient's Dosing Information, Dosing Schedule, and Payment Information as saved on those related screens.
Collecting Party
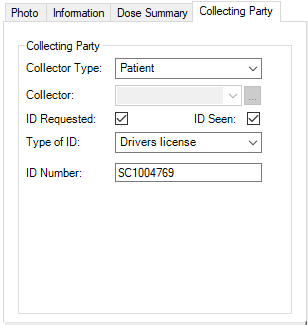
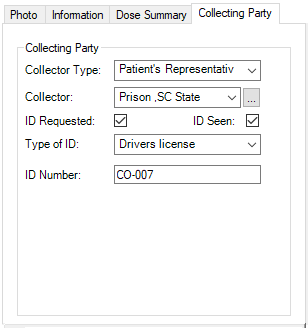
This tab appears if the corresponding Pharmacy Preferences are set for the clinic to track who collects the patients dose(s) at the dosing window. If the patient is receiving the dose, only the 'ID Requested', 'ID Seen', 'Type of ID', and 'ID Number' fields need to be addressed. If a Collecting Party is receiving medication on behalf of the patient, the 'Collector Type' and 'Collector' fields can be used to input the collectors information. Collector and ID Types can be created and edited from the 'Collector Types' and 'ID Types' Code Table Types, found under the Administration menu. Collectors can be created and edited using the 'Collecting Parties' screen found on the Patient menu, or by clicking the ellipsis button to the right of the 'Collector' field.
Dose Summary
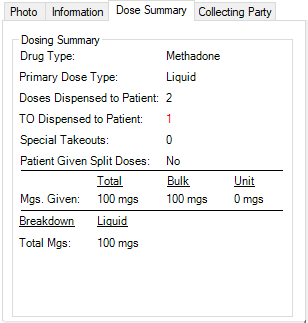
This tab displays a detailed summary of the dosing transaction about to be recorded. Generally users will not have to reference this tab, but users can check this tab to verify that what is physically being dispensed, matches what is being recorded in the system. The 'Mgs. Given' section summarizes the total amount of mgs. being dispensed and a breakdown of the amount taken from Bulk and from Unit inventory. The Breakdown section summarizes how each dose is broken down. For liquid medication, there is no breakdown of each dose.
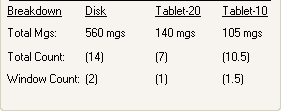
When Diskette or Tablet medication is dispensed, breakdowns will apply to specific dose amounts showing how much of each medication type is being deducted from inventory, as shown below:
Exception Summary
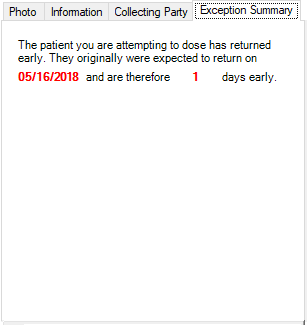
This tab is selected by default and only appears when the selected patient is returning early to the facility. This tab summarizes the early return situation, including how early the patient has returned to the clinic and how many doses they should have in their possession.
Bulk
This Open Inventory Level displays the open bulk bottle inventory levels for the Drug and Dose type combination the selected patient is taking.

Unit
This Open Inventory Level displays the total number of inventory units available for the selected patients primary Drug and Dose type dose amount. Units display under this tab when the selected patient is receiving takeout doses at the window, and if the units are assigned to the patient. Units inventory levels can also be tracked at a 'Summary Level' using Inventory Preferences.

Current Dose Breakdown
This tab is located at the bottom left corner of the Dose Patient screen and provides quick access to the Current Dose Breakdown secondary screen. This screen is where individual doses can be selected and edited as needed to accommodate unusual dosing circumstances. *See the Current Dose Breakdown topic for details on using this screen.
Dosing
This tab is located at the bottom left corner of the Dose Patient screen and is selected by default. This tab allows users to return to the Dose Patient screen after accessing the Current Dose Breakdown secondary screen and saving changes there.
Flags 
Clicking this button will open the 'Flag Messages' pop-up message window. All active patient flags, configured to display flag on 'Dosing', will display in this window for the selected patient. The 'Flag Messages' window appears by default when a patient is retrieved on the Dose Patient screen, this button allows users to re-display them if necessary.
Event 
Clicking this button will bring up the 'Scheduled Event' pop-up window with the selected patient as the attendee. Users can then quickly schedule a new event for the patient.
Labels 
Clicking this button will generate takeout bottle labels for the selected patient for the current dosing instance.
Undo 
This button is only available when the selected patient already has a window dose recorded for today's date, as doses can only be undone on the same day they were dispensed in the system. Clicking this button will bring up the 'Select Dose to Undo' pop-up window. From this screen the user can select and undo a dose previously dispensed to the patient that day.
Exceptions 
Clicking this button launches the 'Dosing Exceptions' pop-up application screen. From this screen, users have four Exception Type options for accurately handling unusual dosing transactions. *See the Dosing Exceptions topic for more information on using this screen.
Pymts. (Payments) 
Clicking this button will launch the 'Patient Payments' pop-up window. This screen is used for entering patient payments or other accounting transactions.
DS (Drug Screen Label) 
Clicking this button will generate a Drug Screen Label for the selected patient.
MD (Orders) 
Clicking this button will open the 'Orders' pop-up window. From this window users can enter an order for the selected patient.
Next 
Clicking this button will retrieve the next available patient from the 'Dosing Queue' and return the currently selected patient to the queue with a status of 'In Line'.
Return 
Clicking this button will return the selected patient back to the 'Dosing Queue' with a status of 'In Line'.
Note 
Clicking this button will open the 'Quick Note' pop-up window, allowing users to enter a Case Note to be saved to the selected patient's 'Case Notes' screen. The Case Note Type used in the 'Quick Note' is defined in Pharmacy Preferences, but by default it is set as a 'Nurse' note.
BAT (Quick BAT) 
Clicking this button opens the 'Quick BAT' pop-up window. From this window, users can enter the results of a Breath/Blood Alcohol test. The entry will save to the selected patients 'Breath/Blood Alcohol History' record.
SDN (Notifications) 
Clicking this button opens the 'Special Dosing Notification' pop-up window. From this window users can review, edit, or enter a 'Special Dosing Message' that will appear on the selected patients Dosing Information screen in the 'Special Dosing Message #1' field.
RX (Prescriptions) 
Clicking this button opens the 'Prescription Information' pop-up window. This button allows users to review, edit, or create a prescription for the selected patient.
Dose + Labels
Clicking this button begins the dosing transaction process, which varies greatly from clinic to clinic, depending on what hardware and system options are being used. If the patient is receiving takeout medication, takeout dose labels will automatically be sent to the configured dosing label printer.
Dose Patient
Clicking this button begins the dosing transaction process in the same way the 'Dose + Labels' button would, but without automatically generating takeout dose labels.
1.) Retrieve the patient to be dosed on the Dose Patient screen, either by selecting the patient from the 'Dosing Queue' or using the 'Patient ID' field.
2.) (Optional) Review the 'Current Dosing Information' fields and verify that the information displayed is accurate for the dosing instance about to be dispensed and recorded. If needed for unique situations, override the data in the 'Patient Returning on', 'Drug Type', 'Dose Type', 'Dose #1', 'Split #2 - Split #4', and/or 'T/O Days' fields as needed.
3.) Click on Dose + Labels. This will begin the dosing process, which can vary greatly depending on the hardware and software options used at the clinic. If the retrieved patient is receiving takeout medication, takeout labels will also begin printing. When the dosing transaction is complete, the 'Patient Dose Completed Successfully' window will appear as shown below:
4.) Click Ok on this confirmation window to return to the 'Dosing Queue', or to the Dose Patient screen if the 'Dosing Queue' is not being used at your facility. *See the Dosing Procedures topic for more information.
|
1.) While the patient is retrieved on the Dose Patient screen,
click on the
2.) Follow the procedure in the Scheduled Event topic section of this guide to enter the details of the event.
3.) Click Save. This will create the event for the selected patient and return the user to the Dose Patient screen.
|
NOTE: Exception dosing is only accessible when the selected patient is returning early to the clinic for a unique dosing instance. (ie. Loss of a takeout or to receive additional takeout doses to the doses already in their possession.) 1.) While the patient is retrieved on the Dose Patient screen,
click on the
|
NOTE: The Current Dose Breakdown tab is only available for use when the patient is returning to the clinic for doses on their expected 'Next Date in Clinic'.
1.) While the patient is retrieved on the Dose Patient screen, click on the Current Dose Breakdown tab at the bottom of the screen. This will change the 'Dose Patient' screen to the Current Dose Breakdown secondary screen display. Refer to the Current Dose Breakdown topic for details on all related options and procedures.
2.) After editing details for the current dosing instance, click on the Dosing tab to be returned to the Dose Patient main display.
3.) The edited changes should show in the 'Current Dosing Information' section of the screen. Complete the dosing process as detailed in the procedure above.
|
Dosing Patients
The full procedure used to dose patients varies greatly from one facility to another. Refer to other topics as needed for the full dosing procedure your facility could use. Dosing patients may or may not include using an automated dispensing pump, printing labels, having patients electronically sign for medication, selecting units from unit inventory, scanning unit barcodes, validating patient fingerprints, clearing flag messages, processing orders and/or dispensing additional medications. Facilities taking payments at the Dosing window should refer to Accounting topics for details on accounting transaction procedures.
Below is a list of Dosing Procedures involving different system functionality. Click on a procedure to see the corresponding topic and procedure details:
Dosing by Hand and Dispensing Other Medications
Dosing Using an Automated Dispensing Pump
Dosing Using an Electronic Signature Pad
Dosing Using a Biometric Fingerprint Reader
Dosing from Unit Inventory at the Summary Level
Dosing from Unit Inventory Using a Barcode Scanner
Overriding Patient Dosing Information on the Dose Patient Screen
This functionality is available in the system to provide the flexibility needed to efficiently handle unusual dosing scenarios, such as a last-minute verbal orders not entered in the system, weather conditions causing abrupt facility closings, and patients appearing at the window intoxicated. When information is overridden on the Dose Patient screen, the change will not be saved as an Order in the system and thus will not appear under the patient's Order History. You should only override information in this manner if you are sure that a doctor's order has been approved to do so and that a hard copy of the order is on file. Often this functionality is used when a 'standing order' is in place to handle certain situations, including Holiday closings, dosing intoxicated patients, and dosing patients absent for 3 consecutive days. (NOTE: There are Pharmacy Preferences available to lock down Dose Patient screen overrides if a facility wishes to do so).
Current Dose Breakdown Changes
When changes are saved on the Current Dose Breakdown, they are only temporary changes related to the current dosing instance. They should be made as the final step before beginning the dosing transaction by clicking on the Dosing tab (beside the Current Dose Breakdown tab) then pressing Dose + Labels or Dose Patient. If you leave the Dose Patient screen, or bring up a new patient, or change anything on the Dose Patient screen, your breakdown edits will be lost, and you will have to re-enter the changes. *See the Current Dose Breakdown topic for more information.
Holiday Takeout Functionality
By default, Methasoft will grant an additional takeout dose to patients for each entered Holiday date on which a facility is closed. This screen accounts for this functionality by automatically increasing the number of 'T/O Days' to reflect additional takeout(s) needed when a patient is retrieved who is scheduled to return on a Holiday date. Alternatively, built in 'Next Present Date' Holiday functionality allows facilities to automatically dispense enough takeout medication to patients to bring them back on their next regularly scheduled day of the week/month following a Holiday closing. This can be defined at the 'Phase Level', but currently only by Methasoft Support in the database. This screen accounts for this functionality for patients on affected Phase Levels by automatically increasing the number of 'T/O Days' preceding a Holiday closing so that the patient will be returned on the next day of the week/month following the Holiday on which they would normally be required to return. *See the Holiday topic for more information.
Total Dispensed by Day Breakdown
Total Dispensed by Day Summary
Inventory Daily Bulk Activity Summary
Clinic accepts Payments at the Dosing Window
Automatically print Payment Receipt at Dosing Window
Maximum Balance Patient is allowed to carry
Lock out patients from dosing when balance is over maximum
Dose Receipt - Require Patient to check in at the Front Desk
Does the clinic use biometrics on dosing
Number of consecutive absences before absent flag appears
Show Special Dosing Message for Completed Drug Screen
Track Bulk Inventory at the Bottle Level
Allow clinic to track Split Inventory
Maximum number of Split Inventory Levels (2-3)