![]()
![]()
(Topic Last Updated On: 05/31/2018)
Counselor > Case Notes
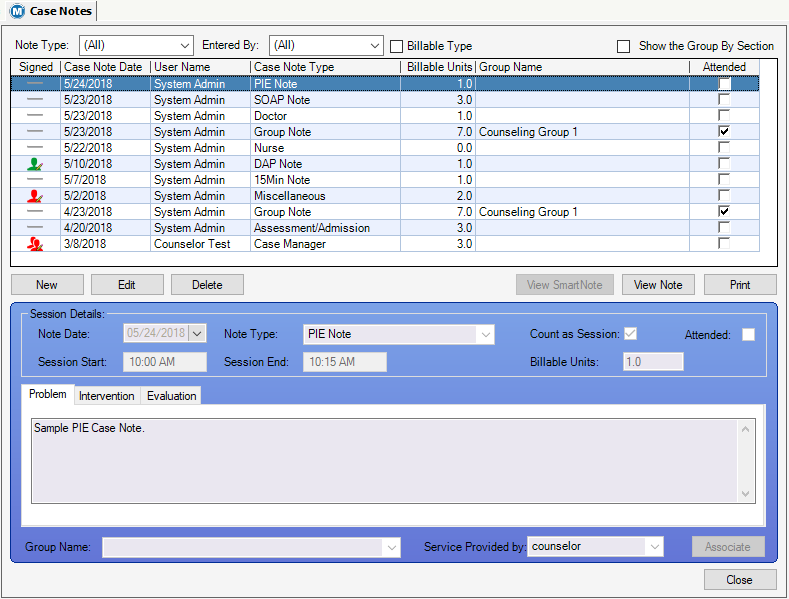
The Case Notes menu item on the Counselor menu launches the Case Notes screen. This screen is also accessible by clicking on the Case Notes button located on the Daily Activities screen, or by clicking the Case Notes menu item under the Counselor shortcut dropdown key. This screen is used to record, edit, and/or delete any type of case or progress note for each patient. This screen is generally used by Counselors to document counseling sessions and record progress notes, however all clinic staff generally use this screen to document different types of progress notes. Note types are fully customizable on the Case Note Template screen, allowing for detail note sections that can be required by the system. The 'Billable Units' field allows facilities to track the number of units the patient should be billed for counseling services. Counselor Preferences provide options for automatically calculating the number of Billable Units based on the 'Session Start' and 'Session End' times entered. Group Notes are entered for group sessions on the Group Notes screen, but will appear on this screen for each patient's Case Note record. The 'Associate' button allows facilities to associate Case Note entries with a patient's active Treatment Plan goals, to establish a clear connection between a patient's goals and progress in treatment.

Note Type
The specific type of Case Note is selected from this dropdown menu. Available selections in this field include all active Case Note types entered on the Case Note Templates screen. This same field appears are the top of the screen where it is used to filter the records in the grid by a selected Case Note type.
Entered By
This field appears are the top of the screen where it is used to filter the records in the grid by the user who entered the Case Note.
Billable Type
This checkbox filed appears at the top of the screen and is used as a grid filtering tool. When checked, the grid refreshes and displays only Case Notes that are configured as 'Billable' from the Case Note Template screen.
Note Date
The date of the case note is selected or entered in this field. Today's date is the default date when creating new Case Notes, however, this date can be backdated when specific Counselor Preferences and user Security Settings are enabled. This date is generally interpreted as the date the documented service or session took place.
Count as Session
Checking this field indicates the case note is documenting a counseling session.
Attended
This field applies to Group Notes and indicates whether or not the patient attended the group session. This field is checked or unchecked automatically for each patient when Group Notes are entered on the Group Notes screen. *See the Group Notes topic for more information.
Session Start
This field is used for documenting the start time of a counseling session.
Session End
This field is used for documenting the end time of a counseling session. This field can be configured to be a 'locked' or an unedited field under the Case Note Templates screen.
Billable Units
This field is used for entering the number of Billable Units the patient should be billed for the counseling service. Counseling Preferences and Case Note Templates can be configured to calculate this value automatically, based on the entered 'Session Start' and 'Session End' times.
(Note Type Detail)
The session note details are entered in this textbox field. The Case Note type selected will appear on the tab above this field, unless multiple detail sections are configured. If multiple detail sections exist for the selected note type, multiple tabs will appear, each with a detail section name as defined on the Case Note Templates screen.
Group Name
This field contains a dropdown menu of Groups. The specific group can be selected from this field to be associated with the Case Note. Groups are typically reserved for Group session Case Note types. The name of the group is automatically selected for each patient when Group Notes are entered from the Group Notes screen. *See the Group Definition topic for more information.
Service Provided By
This field allows for the selection of a specific user to be defined as the employee who provided the counseling service. This feature is important in facilities billing for counseling services based on the Rendering Provider. By default, the user currently logged into Methasoft at the time of the Case Note entry will appear in this field.
Signed
This column contains 'Signature Manager' icons. The icon displayed in this column gives the user an indiction on the Digital Signing status of the Case Note. Double-clicking the icon in this column launches the 'Signature Manager' application window. *See the Digital Signature Setup for more information about this feature.
Case Note Date
This column displays the 'Note Date' for each case note.
User Name
This column displays the 'Employee ID' (User ID) of the user who entered each case note.
Case Note Type
This column displays the specific 'Case Note Type' selected for each case note.
Billable Units
This column displays the number of 'Billable Units' recorded for each case note.
Group Name
This column displays the name of the group for each Group Note entry, generally entered on the Group Notes screen.
Attended
This column displays a checkmark for each Group Note entry where the patient attended a group session.
New
This button is used to create a new Case Note record.
Edit
This button allows for edits to be made to the 'Session Details' fields and note type details of the selected Case Note.
Delete
This button is used to permanently delete Case Note records.
View SmartNote
Clicking this button will open the 'SmartNote' Assessment report in a 'Report Viewer' tabbed window. This button becomes enabled after selecting a Case Note record in the grid that has been associated with a 'SmartNote' Assessment Type on the Case Note Template screen, and the SmartNote Assessment has been completed and saved through the use of the Edit SmartNote button. *See the Assessments topic for more information.
Edit SmartNote
This button becomes enabled after selecting a Case Note record in the grid that has been associated with a 'SmartNote' Assessment Type on the Case Note Template screen and clicking Edit. This button opens the 'SmartNotes' pop-up application window. From this window users can complete, edit, and save the SmartNote Assessment that has been linked to the Case Note on the Case Note Template screen.
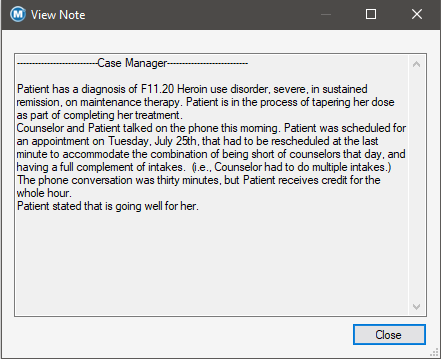
View Note
After selecting a Case Note in the grid, clicking this button will open the 'View Note' window. This pop-up window provides the user with an easier way to view the note type details.

Once a Case Note has been selected on the grid, clicking this button will print the Case Notes report to the configured reports printer for the selected note.
Associate
This button is disabled unless a Case Note has been selected and the Edit button clicked. This button will open the 'Associate Goals' pop-up window, which is used to associate the selected Case Note with Treatment Plan Goals.
Save
This button appears on the screen and is used to apply changes when creating a new or editing an existing Case Note record.
Cancel
This button appears when creating a new or editing an existing Case Note record. Clicking this button will disregard any changes made.
Close
Clicking this button closes the Case Notes screen.
1.) Click on New.
2.) Today's date will appear in the 'Note Date' field. Change this date if needed. This date is generally interpreted as the date the documented service or session took place.
3.) Select the 'Note Type' of the note being entered.
4.) (Optional) Check or uncheck the 'Count as Session' checkbox as needed for the note being entered.
5.) (Optional) Enter the 'Session Start' and 'Session End' times. It is easiest to enter these times by typing directly in these fields, using this format: HH:MM, then pressing 'A' or 'P' on the keyboard to make the AM or PM selection.
6.) (Optional) If necessary, enter the number of 'Billable Units' for the note being entered.
7.) Enter the note details in the textbox. Depending on the Note Type selected, there may be more than one detail section requiring text.
8.) (Optional) If necessary, select an employee from the 'Service Provided by' dropdown field.
9.) Click on Save. This will bring up the 'Associate Goals?' verification dialog box.
10.) (Optional) To associate the note to one or more of the patient's active treatment plan goals, click Yes. This will open the 'Associate Goals' window, displaying all active treatment plan goals for the patient. (Refer to the 'How to Associate a Case Note with Treatment Plan Goals' procedure below.)
11.) Otherwise, click No. This will save the note and return the user to the Case Notes screen.
|
Associating Case Notes with Treatment Plan Goals
This functionality was designed for counselors to be able to clearly document the connection between a patient's treatment plan goals and treatment progress, as documented on the Case Notes screen. This functionality is used by many facilities primarily to produce hard copies of Case Notes that clearly show which treatment plan goals were being addressed by treatment services provided. This functionality can be disabled in Counselor Preferences.
Backdating Note Dates
Case Notes can be backdated provided that Counselor Preference settings are configured to allow it. The number of days back a user is allowed to backdate a note is determined by a setting in Counselor Preferences - General Setup. If the value in this preference is '0', backdating will not be allowed.
Editing Case Notes
Editing Case Notes is also restricted by a preference setting in Counselor Preferences - General Setup. The number of days after which a note can no longer be edited is entered in this field. If '0' is entered as the value in this field, editing case notes will not be allowed.
Group Notes
The Group Notes screen allows users to enter one group note for multiple patients at once. Patients that attended are marked as such, those absent do not receive a checkmark in the 'Attended' field. An option is also available to individualize notes for each patient in the group, using the Individual Note window. When a Group Note is saved, a Case Note record is stored off for each individual patient. *See the Group Notes topic for more information.
Security Considerations
Whenever a new case note template is added, it will often be available immediately for selection on the Case Notes screen. However, before users can enter notes of the new type, they must be granted security access to the new type on the Security Administration screen, 'Object Type' - 'Case Notes'. Furthermore, under 'Object Type' - 'Other', additional security options are available that affect the entry of case notes on the Case Notes screen.
Case Note Activity by Counselor
Case Notes Billable Units by Author
Case Notes Billable Units by Date
Case Notes Billable Units by Patient
Case Notes Billable Units by Provider
Case Notes Billable Units by Service Provider
Case Notes Billable Units Summary by Provider
Patient List Without Case Note
Counselor Preferences > General Setup
Default Time increment for billable units
Warn users for duplicate case note types for the same day
Are users allowed to edit billable units on the case notes screen
Prompt user to associate a case note with a treatment plan
How many days back are users allowed to backdate a case note
Number of days users are able to edit case notes in the past