![]()
![]()
(Topic Last Updated On: 05/05/2010)
The Treatment Plans menu item on the Counselor menu launches the Treatment Plan screen, which is used to enter and manage individualized patient treatment plans in Methasoft. This screen allows users to efficiently create new plans by copying items from Treatment Plan Templates or a patient's previous treatment plan. Plans, Problems, Goals, Methods, Interventions, and Outcomes are tracked on this screen, depending upon the treatment plan requirements at your facility. Plans can be completed or deactivated, depending on your facility's policy. The Quick Individualize option allows users to efficiently document 'In Patient's Own Words' for plan items. The Tx Plan Preselected Items code table on the Administration menu allows facilities to define repetitive, commonly used plan items, which can then be selected for more efficient treatment plan entry, then individualized for each patient. Up to three types of Plans can be tracked, 'Individual', 'Intake' and 'Maintenance', depending on your facility's policy. Upcoming treatment plan review dates appear on the Daily Activities grid for counselors to easily scan for upcoming reviews that are due. The Case Notes screen is accessible from this screen for efficient entry of Treatment Plan Review or other Case Notes. Treatment Plans are displayed in a treeview on this screen as shown below, allowing users to easily view plan items at each level for each Goal. As different plan items are selected in the treeview, the detail section below and the command buttons will change accordingly. This topic provides details for each type of item selected on the treeview. Counselor Preferences allow facilities to choose at what level(s) to track Interventions and 'In Patient's Own Words'.
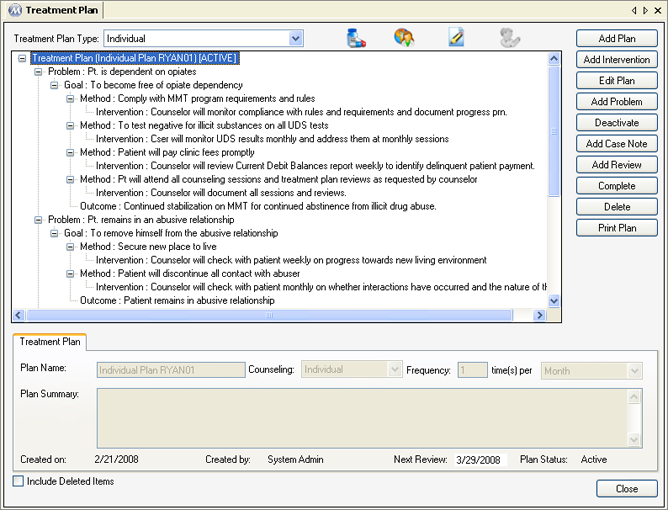
Field Descriptions - Treatment Plan
Treatment Plan Type
This field is used for selecting the type of treatment plan to be added, viewed or modified. Three types are available for selection in this field, 'Individual', 'Maintenance' and 'Intake'. All types function exactly the same, and are used for sorting purposes in some facilities.
Plan Name
This field displays the name of the treatment plan, as created on the New Treatment Plan window. The name can be edited in this field.
Counseling
This field is used for selecting a form or counseling to indicate how often the patient is required to receive it, based on the Frequency selections made.
Frequency: _______ time(s) per _______
The field is related to the Counseling field beside it. The number of time(s) per 'Month', 'Quarter', 'Week' or 'Year' indicates how often the patient is supposed to receive the selected Counseling.
Plan Summary
This text field is used for entering a summary of the treatment plan. This field is optional, and many different formats are used in this field at different facilities.
Created on
This field displays the date on which the plan was created in Methasoft.
Created by
This field displays the name of the user who created the plan in Methasoft.
Next Review
This field displays the closest Next Review Date from the active goals on the plan.
Plan Status
This field displays the plan's current Status, which is either 'Active', 'Inactive', or 'Complete'. Only one active plan for each Treatment Plan Type is allowed for each patient. Plans can be deactivated or completed using the corresponding command buttons, or are deactivated automatically when a new plan of the same type for the same patient is created.
Include Deleted Items
Checking this checkbox will expand the treeview to display any previously deleted items for plans. Items deleted from a plan are 'soft-deleted', meaning they remain in the database and are able to retrieved, viewed, and even restored by checking this box.
Command Buttons - Treatment Plan
![]() (Launch Prescription Information)
(Launch Prescription Information)
Pressing this button opens the Prescription Information window for the retrieved patient, for viewing, editing or adding prescription information.
![]() (Launch Make Referral)
(Launch Make Referral)
Pressing this button opens the Make Referral window for the retrieved patient, for viewing, editing or adding referrals.
![]() (Launch SNAP)
(Launch SNAP)
Pressing this button opens the SNAP window for the retrieved patient, for viewing, editing or adding SNAP records.
Add Plan
Pressing this button opens the New Treatment Plan window, for creating a new treatment plan.
Add Intervention
This button appears for different levels of the treeview according to Counselor Preferences - Tx Plan Preferences settings, which determine at what plan levels Interventions can be added. Pressing this button will add a node beneath the selected item for adding an Intervention.
Edit Plan
This button appears when a Treatment Plan is selected on the treeview. Pressing this button enables the plan's details for editing.
Add Problem
This button appears when a Treatment Plan or Problem is selected on the treeview. Pressing this button adds a node on the treeview beneath a plan, and enables the detail section of the window for adding a problem.
Deactivate/Activate
This button appears when a Treatment Plan is selected on the treeview. If the selected plan is active, Deactivate will appear, and pressing it will make the selected plan inactive. If the selected plan is inactive, Activate will appear, and pressing it will make the selected plan active.
Add Case note
This button appears when a Treatment Plan is selected on the treeview. Pressing this button opens the Case Notes screen for the retrieved patient, for adding a Case Note.
Add Review
This button appears when a Treatment Plan is selected on the treeview. Pressing this button opens the Case Notes screen for the retrieved patient, for adding a Treatment Plan Review note.
Complete/UnComplete
This button appears when a Treatment Plan is selected on the treeview. If the selected plan is active, Complete will appear, and pressing it will give the selected plan a 'Complete' status. If the selected plan has previously been completed, UnComplete will appear, and pressing it will return the selected plan's status to an 'Active'.
Delete/Restore
Once an item is selected on the treeview, pressing the Delete button will bring up a confirmation message confirming you want to delete the selected item. Pressing Yes on this message will delete the selected item. If a deleted item is selected on the treeview, pressing the Restore button will bring up a confirmation message confirming you want to restore the selected item. Pressing Yes on this message will un-delete the selected item.
Print Plan
Pressing this button opens the What would you like to print? window, for printing the summary level, detail level, or both Treatment Plan reports for the selected plan.
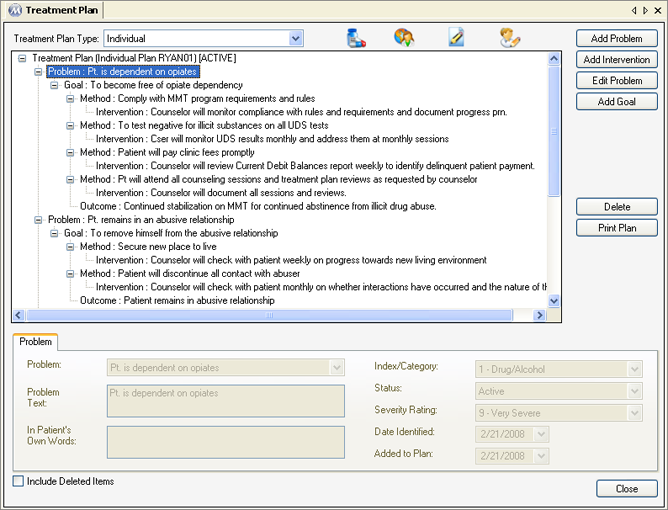
Problem
This field is used for selecting a preselected Problem. Available selections in this field include all Problems entered on the Tx Plan Preselected Items screen, found on the Administration menu. '(Other)' is always an option in this field, for typing in the Problem Text.
Problem Text
This field is used for entering the text of the Problem. If a preselected Problem was selected, then it's text will be automatically imported into this field. If '(Other)' is selected as the Problem, users type the text of the Problem into this field.
In Patient's Own Words
This field is used for entering the Problem text as the patient words it. This field will appear for different plan items in the treeview based on Counselor Preferences - Tx Plan Preferences settings, which determine at what plan levels to track this data.
Index/Category
This field is used for selecting the Index or Category of a problem, which will often vary for different facilities. Available selections include all entries in the Treatment Plan Problem Categories code table, entered on the Code Tables screen.
Status
The current Status of the problem is selected here. Available selections include 'Active', 'Inactive', 'Ongoing', 'Resolved'.
Severity Rating
This field is used for selecting the Severity Rating of a problem, which will often vary for different facilities. Available selections include all entries in the Treatment Plan Problem Severity Ratings code table, entered on the Code Tables screen.
Date Identified
This field is used for selecting the date the problem was identified by a staff member. The current date is defaulted into this field, but can be overridden as needed.
Added to Plan
This field is used for selecting the date the problem was added to the patient's treatment plan, which is generally the same date the problem was identified. The current date is defaulted into this field, but can be overridden as needed.
![]() (Quick Individualize)
(Quick Individualize)
This button appears when any item except a Treatment Plan is selected on the treeview. Pressing it will open the Individualize... window, which provides an efficient interface for entering 'In Patient's Own Words' data for all plan items at the level selected.
Add Problem
Pressing this button adds a node on the treeview beneath a plan, and enables the detail section of the window for adding a problem.
Add Intervention
This button appears for different levels of the treeview according to Counselor Preferences - Tx Plan Preferences settings, which determine at what plan levels Interventions can be added. Pressing this button will add a node beneath the selected item for adding an Intervention.
Edit Problem
Once a Problem is selected on the treeview, pressing this button enables the Problem's details for editing.
Add Goal
Pressing this button adds a node on the treeview beneath a selected problem, and enables the detail section of the window for adding a Goal.
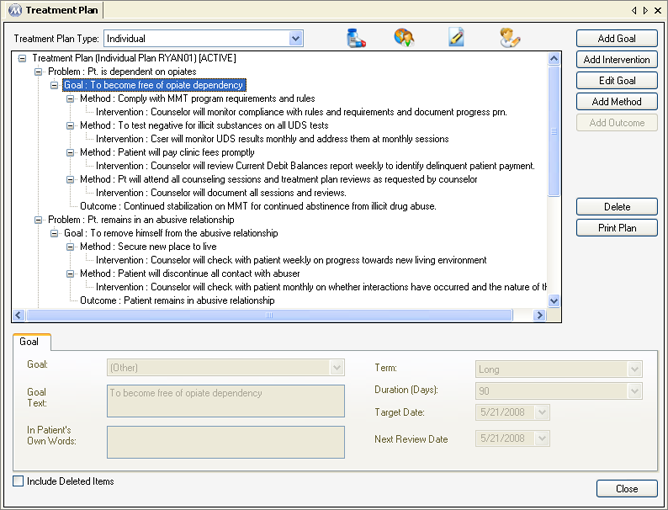
Goal
This field is used for selecting a preselected Goal. Available selections in this field include all Goals entered on the Tx Plan Preselected Items screen, found on the Administration menu. '(Other)' is always an option in this field, for typing in the Goal Text.
Goal Text
This field is used for entering the text of the Goal. If a preselected Goal was selected, then it's text will be automatically imported into this field. If '(Other)' is selected as the Goal, users type the text of the Goal into this field.
In Patient's Own Words
This field is used for entering the Goal text as the patient words it. This field will appear for different plan items in the treeview based on Counselor Preferences - Tx Plan Preferences settings, which determine at what plan levels to track this data.
Term
The Term of the Goal, 'Long' or 'Short' is selected in this field. If 'Short' is selected here, then '30' or '60' will be available for selection in the Duration (Days) field. If 'Long' is selected here, then '90', '180', or '360' will be available for selection in the Duration (Days) field.
Duration (Days)
The number of days in which the goal is scheduled to be accomplished is selected in this field. Available selections for this field depend on Term selected. The number selected in this field is used to calculate the default Target and Next Review Dates.
Target Date
The date on which the goal is scheduled to be accomplished is selected in this field. By default, the system automatically calculates this date based on the current date and the number of days selected in the Duration (Days) field. This date can be overridden as needed.
Next Review Date
The date on which the goal is scheduled to be reviewed by a staff member is selected in this field. By default, the system automatically calculates this date based on the current date and the number of days selected in the Duration (Days) field. This date can be overridden as needed. The date in this field shows up in numerous places in the system, such as on the Daily Activities screen in the 'Next Review' grid column.
Add Goal
Pressing this button adds a node on the treeview beneath a selected problem, and enables the detail section of the window for adding a Goal.
Add Intervention
This button appears for different levels of the treeview according to Counselor Preferences - Tx Plan Preferences settings, which determine at what plan levels Interventions can be added. Pressing this button will add a node beneath the selected item for adding an Intervention.
Edit Goal
Once a Goal is selected on the treeview, pressing this button enables the Goal's details for editing.
Add Method
Pressing this button adds a node on the treeview beneath a selected goal, and enables the detail section of the window for adding a Method.
Add Outcome
Only one Outcome can be entered for each goal, after which this button becomes disabled for the selected goal. Pressing this button adds a node on the treeview beneath a selected goal, and enables the detail section of the window for adding an Outcome.
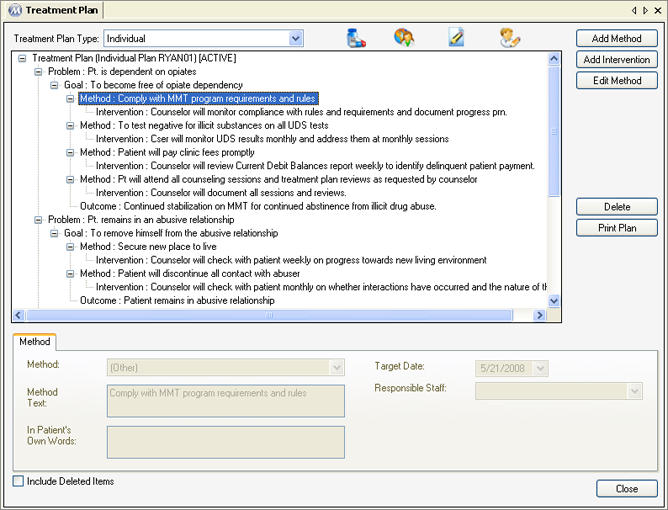
Method
This field is used for selecting a preselected Method. Available selections in this field include all Methods entered on the Tx Plan Preselected Items screen, found on the Administration menu. '(Other)' is always an option in this field, for typing in the Method Text.
Method Text
This field is used for entering the text of the Method. If a preselected Method was selected, then it's text will be automatically imported into this field. If '(Other)' is selected as the Method, users type the text of the Method into this field.
In Patient's Own Words
This field is used for entering the Method text as the patient words it. This field will appear for different plan items in the treeview based on Counselor Preferences - Tx Plan Preferences settings, which determine at what plan levels to track this data.
Target Date
The date on which the Method is scheduled to be accomplished is selected in this field. The current date is defaulted into this field by the system, but can be overridden as needed.
Responsible Staff
This field is used to assign a Responsible Staff member for each Method. Available selections include all active users on the Employee Administration screen. Most users leave this field blank, unless it is required at your facility.
Add Method
Pressing this button adds a node on the treeview beneath a selected goal, and enables the detail section of the window for adding a Method.
Add Intervention
This button appears for different levels of the treeview according to Counselor Preferences - Tx Plan Preferences settings, which determine at what plan levels Interventions can be added. Pressing this button will add a node beneath the selected item for adding an Intervention.
Edit Method
Once a Method is selected on the treeview, pressing this button enables the Method's details for editing.
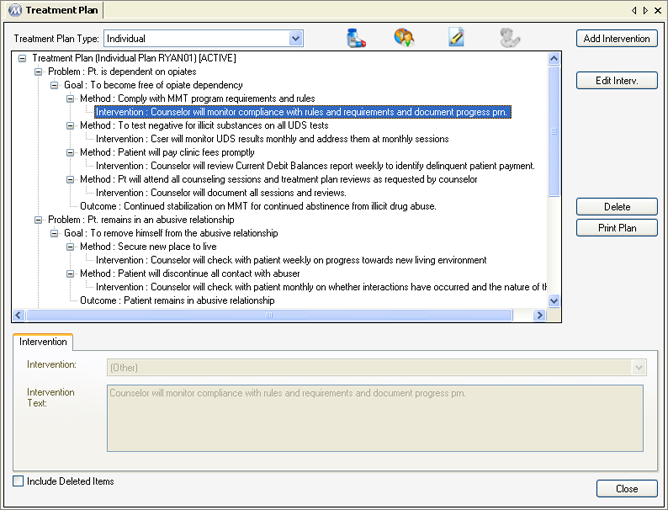
Field Descriptions - Intervention
Intervention
This field is used for selecting a preselected Intervention. Available selections in this field include all Interventions entered on the Tx Plan Preselected Items screen, found on the Administration menu. '(Other)' is always an option in this field, for typing in the Intervention Text.
Intervention Text
This field is used for entering the text of the Intervention. If a preselected Intervention was selected, then it's text will be automatically imported into this field. If '(Other)' is selected as the Intervention, users type the text of the Intervention into this field.
Command Buttons - Intervention
Add Intervention
This button appears for different levels of the treeview according to Counselor Preferences - Tx Plan Preferences settings, which determine at what plan levels Interventions can be added. Pressing this button will add a node beneath the selected item for adding an Intervention.
Edit Intervention
Once an Intervention is selected on the treeview, pressing this button enables the Intervention's details for editing.
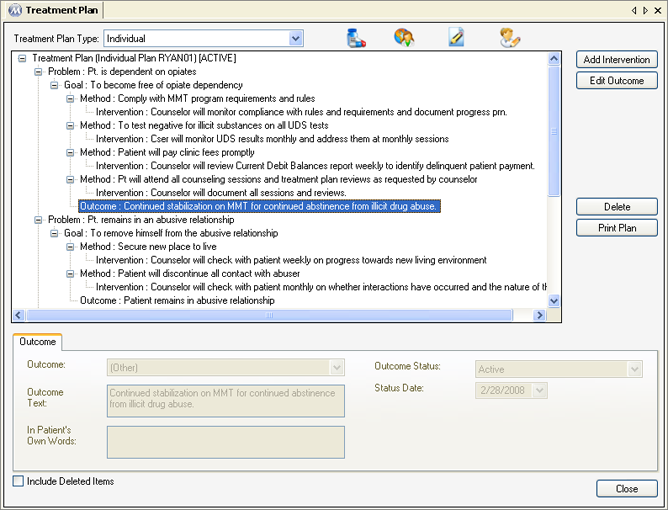
Outcome
This field is used for selecting a preselected Outcome. Available selections in this field include all Outcomes entered on the Tx Plan Preselected Items screen, found on the Administration menu. '(Other)' is always an option in this field, for typing in the Outcome Text.
Outcome Text
This field is used for entering the text of the Outcome. If a preselected Outcome was selected, then it's text will be automatically imported into this field. If '(Other)' is selected as the Outcome, users type the text of the Outcome into this field.
In Patient's Own Words
This field is used for entering the Outcome text as the patient words it. This field will appear for different plan items in the treeview based on Counselor Preferences - Tx Plan Preferences settings, which determine at what plan levels to track this data.
Outcome Status
The field displays current status of the Outcome. Available selections include 'Active', 'Completed', and 'Inactive'.
Status Date
The field displays the date of the Current Status, which is generally interpreted to mean as of the Status Date, the outcome has the selected Outcome Status.
Add Intervention
This button appears for different levels of the treeview according to Counselor Preferences - Tx Plan Preferences settings, which determine at what plan levels Interventions can be added. Pressing this button will add a node beneath the selected item for adding an Intervention.
Edit Outcome
Once an Outcome is selected on the treeview, pressing this button enables the Outcome's details for editing.
Treatment Plan Types
Many facilities use only one Treatment Plan Type, generally 'Individual'. Other facilities prefer to use different types of plans for sorting options when copying from treatment plans, treatment plan templates, or running reports. It is up to your facility to decide what types should be used for optimal treatment plan management.
Tx Plan Preselected Items Code Table
This code table is accessible from the Administration menu, and defines what preselected treatment plan items will be available for selection in the 'Problem', 'Goal', 'Method', 'Intervention', and 'Outcome' fields. Preselected items are associated to other plan items just as treatment plan items are associated to items above them on the Treatment Plan screen treeview. Thus if you select a preselected item on the Treatment Plan screen, the preselected items available at lower plan levels will only be those associated to the higher level selection made. Refer the Tx Plan Preselected Items topic for more details on how these items are configured.
Next Review Dates
These dates are entered for Goals, and appear on multiple screens and reports throughout the system. Since most treatment plans contain multiple goals, the system will always display the closest upcoming Next Review Date for each patient.
Methods and Interventions
Treatment Plan terminology often varies at different facilities. Generally, 'Methods' refer to specific, detailed steps the patient will have to take/complete to accomplish the associated goal. 'Intervention' refers to the specific action required by staff to help the patient complete a Method (or possibly other treatment plan items depending on your Counselor Preferences - Tx Plan Preferences configuration).
Managing Outcomes
Different facilities manage Outcomes in Methasoft differently. Generally, Outcomes are entered at the time Goals are identified and added to a plan, with an 'Outcome Status' of 'Active' and a 'Status Date' showing the current date. Then when the Goal is reviewed, the 'Outcome Status' and 'Status Date' are updated accordingly. Other facilities prefer not to enter an Outcome at the time a Goal is added, instead waiting until the first time the Goal is reviewed to make the first Outcome entry.
Creating New Treatment Plans vs Updating One Plan Continuously
Some facilities are required to create new treatment plans on an incremental schedule, instead of just updating the patient's existing plan. The 'Copy from (optional)' options available on the New Treatment Plan window when creating a new plan make this process very efficient. Each facility must decide which method should be used to satisfy regulatory and accreditation requirements.
Completing, UnCompleting, Deactivating, Reactivating
Only one plan of each Treatment Plan Type can have an 'Active' status for a patient. Additional plans of the same type for the same patient will have either an 'Inactive' or 'Complete' status. In facilities continuously updating a patient's active plan (or even one active plan of each Treatment Plan Type), the Complete/UnComplete and Deactivate/Activate command buttons are rarely needed.
Deleting Treatment Plan Items
Because treatment plan items are associated with one another in a hierarchal form, the system will not allow a plan item to be deleted without first deleting the items associated beneath it. To delete an item, always begin by deleting the lowest level 'child' item associated to that item. Also keep in mind that items are only 'soft-deleted', meaning they can be restored using the 'Include Deleted Items' checkbox and the Restore button.
Require Tx Plan Completion Note
Clinic tracks Outcome level interventions
Clinic tracks Method level interventions
Clinic tracks Goal level interventions
Clinic tracks Problem level interventions
Clinic tracks Plan level interventions
Display Patients own words on Problems
Display Patients own words on Goals
Display Patients own words on Methods
Display Patients own words on Outcomes