![]()
![]()
(Topic Last Updated On: 05/05/2010)
The Daily Activities menu item on the Counselor menu launches the Daily Activities screen, which is generally used by counselors and case managers for managing most activities and documentation for patient caseloads. Other staff members often use this screen as well, depending on the policies at your facility. When this screen is opened the caseload assigned to a logged-in counselor appears by default on the grid. All patients are displayed by default for other logged-in users. Once a patient is selected, information and system functions under each of the tabs in the bottom half of the screen are accessible for the selected patient, including Patient Profile and general patient information, Drug Screen Results, Patient Flags, Pending Orders, Treatment Plan Goals, Dosing History, Scheduled Events, and Linked Documents functionality, which allows users to link documents created outside of Methasoft to patients for efficient retrieval and viewing. The Case Notes and Profile buttons provide efficient access to the Patient Profile and Case Notes screen for a selected patient. The 'Include Inactive Patients in List' checkbox allows users to easily find inactive patients who have returned to a facility for re-admission. The Check In button allows counseling and case management staff check-in patients for dosing if applicable at your facility.
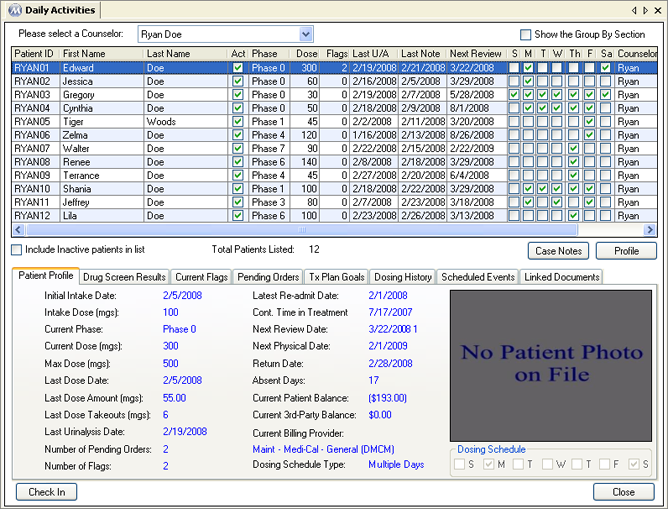
Please select a Counselor
This field is for selecting a counselor's caseload of patients to appear on the grid. Users who have a 'Counselors' job role on the Security Administration screen are available for selection in this list, and 'All' to display all patients. When a counselor is logged into Methasoft and opens this screen, his name will be selected by default, displaying the caseload of patients assigned to him. 'All' is selected here by default for logged in users without 'Counselors' job roles.
Include Inactive patients in list
By default the list of patients on the grid are active patients, marked as 'Active' on the Patient Profile screen. Checking this checkbox will expand the list to include all Inactive patients as well.
Total Patients Listed
This field displays the number of patients currently displayed on the grid.
Patient ID
This column displays the 'Patient ID' number for each patient, as assigned on the Patient Profile screen.
First Name
This column displays the 'First Name' of each patient, as entered on the Patient Profile screen.
Last Name
This column displays the 'Last Name' of each patient, as entered on the Patient Profile screen.
Act. (Active)
This column displays a checkmark for each currently Active patient, as marked on the Patient Profile screen.
Phase
This column displays the 'Phase Type' of each patient, as entered on the Dosing Information screen.
Dose
This column displays the total daily dosage amount for each patient, as entered in the 'Dose Amounts' fields on the Dosing Information screen.
Flags
This column displays the number of patient flags pending for each patient, as entered on the Flag Patient screen.
Last U/A
This column displays the date of the most recent drug screen result for each patient, as entered on the Drug Screen Results screen.
Last Note
This column displays the date of the most recent Case Note entry for each patient, as entered on the Case Notes or Group Notes screens. Only certain note types will update this date, depending on each note type's settings on the Case Note Templates screen.
Next Review
This column displays the closest upcoming treatment plan goal review date for each patient, as entered on the Treatment Plan screen.
S-M-T-W-Th-F-Sa
These columns display a checkmark for days of the week each patient attends the clinic, as entered in the 'Weekly Schedule' fields on the Dosing Information screen. No days will appear checked for patients on 'Every XX Days' Schedule Types, which are generally not used.
Counselor
This column displays the 'Employee ID' (User ID) of the 'Counselor' assigned to each patient, as assigned on the Patient Profile screen.
Billing Provider
This column displays the 'Billing Provider' assigned to each patient, as entered on the Payment Information screen.
Case Notes
Once a patient has been selected on the grid, pressing this button will open the Case Notes screen for viewing, editing or adding case notes for the selected patient.
Profile
Once a patient has been selected on the grid, pressing this button will open the Patient Profile screen for viewing or editing the selected patient's profile.
Check In
Once a patient has been selected on the grid, pressing this button will give the selected patient an electronic Daily Dose Receipt, which clears the patient to proceed to the dosing window in facilities requiring patients to check in before dosing.
Field Descriptions - Patient Profile Tab
Initial Intake Date
This field displays a selected patient's 'Intake Date', as entered on the Dosing Information screen.
Intake Dose (mgs)
This field displays a selected patient's 'Intake Dose' amount, as entered on the Dosing Information screen.
Current Phase
This field displays a selected patient's 'Phase Type', as entered on the Dosing Information screen.
Current Dose (mgs)
This field displays a selected patient's total daily dosage amount, as entered on the Dosing Information screen.
Max Dose (mgs)
This field displays a selected patient's 'Max Daily Dose Amount', as entered on the Dosing Information screen.
Last Dose Date
This field displays a selected patient's last 'Dosed On' or 'Dosed Date', as saved on the Dose Patient screen and appearing in the patient's Dosing History.
Last Dose Amount (mgs)
This field displays the daily amount of mgs received on the 'Last Dose Date' by a selected patient.
Last Dose Takeouts
This field displays the quantity of takeouts received on the 'Last Dose Date' by a selected patient.
Last Urinalysis Date
This field displays the date of the most recent drug screen result for a selected patient, as entered on the Drug Screen Results screen. This date matches the date appearing in the 'Last U/A' grid column.
Number of Pending Orders
This field displays the number of orders scheduled to take effect for a selected patient, as entered on the Orders and/or Titrate/Detox Order screen.
Number of Flags
This field displays the number of patient flags pending for a selected patient, as entered on the Flag Patient screen. This number matches the number appearing in the 'Flags' grid column.
Latest Re-admit Date
This field displays the 'Latest re-admission date' for a selected patient, as entered on the Dosing Information screen.
Cont. Time in Treatment
This field displays 'Time in Tx Starts on' date for a selected patient, as entered on the Dosing Information screen.
Next Review Date
This field displays the closest upcoming treatment plan goal review date for a selected patient, as entered on the Treatment Plan screen. This date matches the date appearing in the 'Next Review' grid column.
Next Physical Date
This field displays a date one year from a selected patient's most recent 'Intake Date' or 'Latest re-admission date', as entered on the Dosing Information screen.
Return Date
This field displays the date a selected patient is scheduled to return to the clinic, as saved on the Dosing Information screen.
Absent Days
This field displays the total number of Absent records for a selected patient, as saved on the Absent Records screen.
Current Patient Balance
This field displays the current 'Patient Balance' amount for a selected patient. Credit balance amounts appear in parentheses.
Current 3rd-Party Balance
This field displays the current '3rd-Party Balance' amount for a selected patient. Credit balance amounts appear in parentheses.
Current Billing Provider
This field displays the 'Billing Provider' assigned to a selected patient, as entered on the Payment Information screen. This name matches the name appearing in the 'Billing Provider' grid column.
Dosing Schedule Type
This field displays the type of dosing schedule on which a selected patient attends the clinic, as entered in the 'Schedule Type' field on the Dosing Information screen.
(Photo)
This field displays a selected patient's photo, as selected on the Patient Profile screen.
Dosing Schedule
This field displays the days of the week a selected patient is scheduled to attend the clinic. These days will match the days marked in the 'S-M-T-W-Th-F-Sa' columns on the grid.
Grid Columns - Drug Screen Results Tab
Test Date
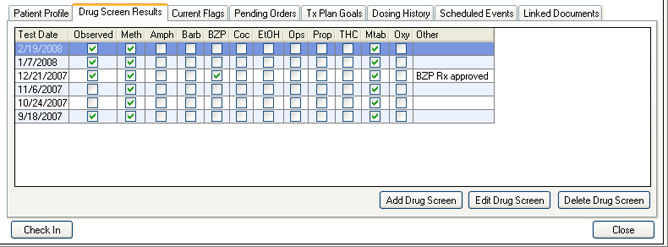
This column displays the 'Test Date' entered for each result on the Drug Screen Results screen.
Observed
A checkmark appears in this column for each result marked as 'Observed' on the Drug Screen Results screen.
Meth - Oxy (Drug Panel)
These columns display the positive or negative result for each drug type included on the drug panel tested at your facility. A checkmark indicates a positive result.
Other
This column displays each results 'Other Information' comments, as entered on the Drug Screen Results screen.
Command Buttons - Drug Screen Results Tab
Add Drug Screen
Once a patient has been selected on the grid, pressing this button will open the Drug Screen Results screen for the selected patient, for viewing, adding or editing drug screen results.
Edit Drug Screen
Once a patient has been selected on the grid, and a result has been selected in the bottom grid, pressing this button will open the Drug Screen Results screen for the selected patient, in edit mode for editing the selected result.
Delete Drug Screen
Once a patient has been selected on the grid, and a result has been selected in the bottom grid, pressing this button will bring up a 'Delete this record?' message box, confirming you want to delete the selected result. Pressing Yes then deletes the selected result.
Grid Columns - Current Flags Tab
Next Flag
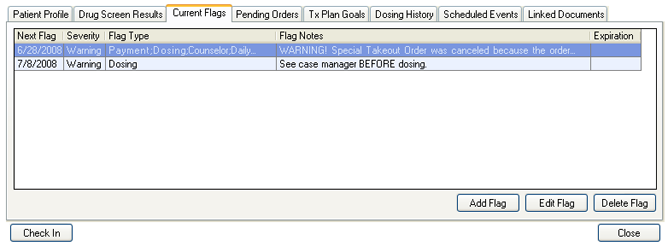
This column displays the 'Next Flag Date' for each flag, as entered on the Flag Patient screen.
Severity
This column displays the 'Flag Severity' for each flag, as entered on the Flag Patient screen.
Flag Type
This column displays the 'Display Flag on Screen' selection(s) made for each flag, as entered on the Flag Patient screen.
Flag Notes
This column displays the 'Flag Notes' for each flag, as entered on the Flag Patient screen.
Expiration
This column displays the 'Flag Expires On' for each flag, as entered on the Flag Patient screen.
Command Buttons - Current Flags Tab
Add Flag
Once a patient has been selected on the grid, pressing this button will open the Flag Patient screen for the selected patient, for viewing, adding or editing patient flags.
Edit Flag
Once a patient has been selected on the grid, and a flag has been selected in the bottom grid, pressing this button will open the Flag Patient screen for the selected patient, in edit mode for editing the selected flag.
Delete Flag
Once a patient has been selected on the grid, and a flag has been selected in the bottom grid, pressing this button will bring up a 'Delete this record?' message box, confirming you want to delete the selected flag. Pressing Yes then deletes the selected flag.
Grid Columns - Pending Orders Tab
Order Type
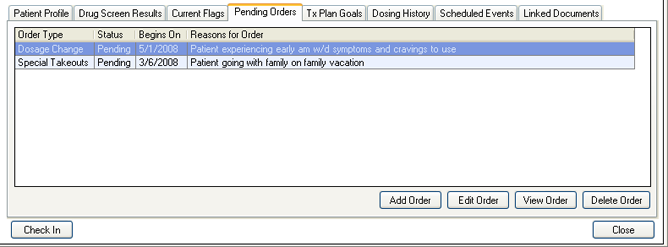
This column displays the 'Order Type' for each order, as selected on the Orders screen.
Status
This column displays a status of 'Pending' for each order, unless the order is a Titrate Up or Detox order that is 'In Progress'.
Begin On
This column displays the 'Process On' date for each order, as entered on the Orders screen.
Reasons for Order
This column displays the 'Reason/Notes' text for each order, as entered on the Orders screen. For 'Custom' orders, the 'Summary' text is displayed, since 'Reason/Notes' text is not entered for the 'Custom' order type on the Orders screen.
Command Buttons - Pending Orders Tab
Add Order
Once a patient has been selected on the grid, pressing this button will open the Orders screen for the selected patient, for viewing, adding or editing an order.
Edit Order
Once a patient has been selected on the grid, and an order has been selected in the bottom grid, pressing this button will open the Orders screen for the selected patient, in edit mode for editing the selected order.
View Order
Once a patient has been selected on the grid, and an order has been selected in the bottom grid, pressing this button will open the Orders screen for the selected patient, displaying the details of the selected order.
Delete Order
Once a patient has been selected on the grid, and an order has been selected in the bottom grid, pressing this button will bring up a 'Delete this record?' message box, confirming you want to delete the selected order. Pressing Yes then deletes the selected order.
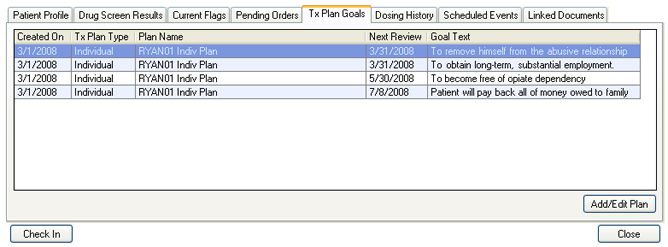
Grid Columns - Tx Plan Goals Tab
Created On
This column displays the date on which each Goal was created in Methasoft, as entered on the Treatment Plan screen.
Tx Plan Type
This column displays type of treatment plan each goal is associated with, as selected for each plan on the Treatment Plan screen.
Plan Name
This column displays the 'Plan Name' for the treatment plan each goal is associated with, as entered on either the New Treatment Plan window or Treatment Plan screen.
Next Review
This column displays 'Next Review Date' for each goal, as selected on the Treatment Plan screen.
Goal Text
This column displays the 'Goal Text' for each goal, as entered on the Treatment Plan screen.
Command Buttons - Tx Plan Goals Tab
Add/Edit Plan
Once a patient has been selected on the grid, pressing this button will open the Treatment Plan screen for the selected patient, for viewing, adding or editing treatment plans. Selecting a goal on the grid has no effect on the results of pressing this button.
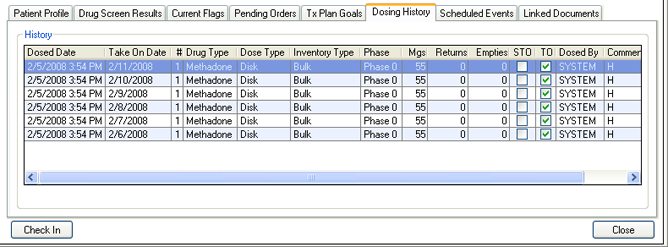
Grid Columns - Dosing History Tab
Dosed Date
This column displays the date each dosing transaction was recorded in the system.
Take On Date
This column displays the date each dose is prescribed to be ingested by the patient.
#
This column displays the Dose Number of each dose, which applies to patients receiving split doses. Normally only #s 1 - 4 will appear in this column, however since the system allows up to 4-way splits and exception dosing procedures, it is possible to end up with Dose #s in this column higher than 4.
Drug Type
This column displays the Drug Type that was dispensed for each transaction.
Dose Type
This column displays the Dose Type that was dispensed for each transaction.
Inventory Type
This column displays the Inventory Type of each transaction, indicating whether the mgs were dispensed from Bulk or Unit inventory.
Phase
This column displays the Phase Type (Level) of the patient at the time each transaction was recorded.
Mgs
This column displays the mg amount of each dosing transaction.
Returns
This column displays the number of full, unopened doses returned to your facility and recorded with each dosing transaction. This column generally displays '0' unless a patient returns early to receive additional medication, in which case the 'Returned Early' Dosing Exception is used, recording this value.
Empties
This column displays the number of empty dosing bottles returned to your facility and recorded with each dosing transaction. The number of empty bottle returns is entered in the 'Empty Bottles' field on the Dose Patient screen.
STO
This column displays a checkmark for each dose marked as a special takeout in the system. Doses are marked as special takeouts when a Special Takeouts order is entered in the system, and the 'Number of Takeouts considered Special Takeouts' is defined on the Orders screen.
TO
This column displays a checkmark for each dose marked as a takeout. Doses are considered takeout doses if they are administered to a patient to be ingested on another date outside of the facility.
Dosed By
This column displays the user ID for the user who recorded each dosing transaction.
Comments
This column displays 'Dose Comments' recorded with each transaction.
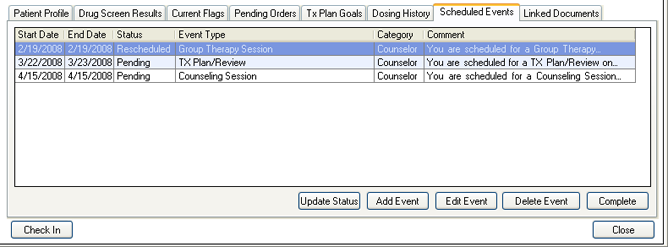
Grid Columns - Scheduled Events Tab
Start Date
This column displays the 'Start Due Date' for each event, as entered on the Scheduled Event window.
End Date
This column displays the 'End Due Date' for each event, as entered on the Scheduled Event window.
Status
This column displays the current event status for each event. 'Pending' and 'Rescheduled' events are due today or in the future. 'Overdue' events have a Start Date in the past.
Event Type
This column displays type of each event, as selected on the Scheduled Event window.
Category
This column displays the 'Event Category' each Event Type belongs to for each event, as selected on the Scheduler - Preferences screen, found on the Administration menu.
Comment
This column displays the 'Comment' text for each event, as saved on the Scheduled Event window.
Command Buttons - Scheduled Events Tab
Update Status
Once a patient has been selected on the grid, and an event has been selected in the bottom grid, pressing this button will open the Update Event Status window for the selected event, for updating the event's status.
Add Event
Once a patient has been selected on the grid, pressing this button will open the Scheduled Event window for the selected patient, for adding a scheduled event.
Edit Event
Once a patient has been selected on the grid, and an event has been selected in the bottom grid, pressing this button will open the Scheduled Event window for the selected event, in edit mode for editing the selected event.
Delete Event
Once a patient has been selected on the grid, and an event has been selected in the bottom grid, pressing this button will bring up a 'Delete this event?' message box, confirming you want to delete the selected event. Pressing Yes then deletes the selected event.
Complete
Once a patient has been selected on the grid, and an event has been selected in the bottom grid, pressing this button will bring up a 'Complete this event?' message box, confirming you want to change the status of the selected event to 'Complete'. Pressing Yes then completes the selected event.
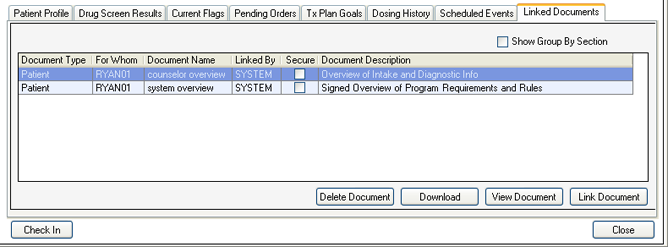
Grid Columns - Linked Documents Tab
Document Type
This column displays the 'Document Type' of each linked document, as selected on the Link Document window.
For Whom
This column displays the 'Patient ID' number for the patient each document is linked to.
Document Name
This column displays the 'Document Name' for each linked document, as entered or selected on the Link Document window, but excluding file extensions.
Linked By
This column displays the User ID for the user who linked each document.
Secure
This column displays a checkmark for each linked document marked as secure on the Link Document window.
Document Description
This column displays the 'Document Description' for each document, as entered on the Link Document window.
Command Buttons - Linked Documents Tab
Delete Document
Once a patient has been selected on the grid, and a document has been selected in the bottom grid, pressing this button will bring up a 'Delete Document?' message box, confirming you want to delete the link to the selected document. Pressing Yes then deletes the link.
Download
Once a patient has been selected on the grid, and a document has been selected in the bottom grid, pressing this button will bring up a standard 'Browse for Folder' window, for selecting a location on your computer to download the document to. Once a location is selected and OK is pressed, the document will download, followed by a 'Download Completed' message box, confirming the document downloaded successfully.
View Document
Once a patient has been selected on the grid, and a document has been selected in the bottom grid, pressing this button will open a Document (READ-ONLY) - (Document Name) viewer screen, displaying the linked document for viewing.
Link Document
Once a patient has been selected on the grid, pressing this button will open the Link Document window for the selected patient, for linking a document to the selected patient. 'Clinic' documents can also be linked on this window, regardless of whether or not a patient has been selected.
|
1.) Select the patient in the grid for whom the note is being entered.
2.) Click on Case Notes. This will open the Case Notes screen for the selected patient, for adding, editing, or viewing notes.
***Refer to the Case Notes topic's Procedures section for detailed procedural information on the Case Notes screen.
|
|
1.) Select the patient in the grid whose profile you wish to access.
2.) Click on Profile. This will open the Patient Profile screen for the selected patient, for adding, editing, or viewing profile information.
***Refer to the Patient Profile topic's Procedures section for detailed procedural information on the Patient Profile screen.
|
|
1.) Select the patient in the grid for whom you wish to add a flag.
2.) Select the Current Flags tab in the bottom half of the screen.
3.) Click on Add Flag. This will open the Flag Patient screen for the selected patient, for adding, editing, or viewing flags.
4.) Refer to the 'How to Add a Flag' procedure found in the Flag Patient topic.
|
|
1.) Select the patient in the grid for whom you wish to edit a flag.
2.) Select the Current Flags tab in the bottom half of the screen.
3.) Select the flag you wish to edit on the bottom grid.
4.) Click on Edit Flag. This will open the Flag Patient screen for the selected flag, in edit mode for editing the flag.
5.) Refer to the 'How to Edit a Flag' procedure found in the Flag Patient topic.
|
|
1.) Select the patient in the grid for whom you wish to add an order.
2.) Select the Pending Orders tab in the bottom half of the screen.
3.) Click on Add Order. This will open the Orders screen for the selected patient, for adding an order.
4.) Refer to the 'How to Add an Order' procedure found in the Orders Overview topic.
|
|
1.) Select the patient in the grid whose treatment plan you wish to access.
2.) Select the Tx Plan Goals tab in the bottom half of the screen.
2.) Click on AdD/Edit Plan. This will open the Treatment Plan screen for the selected patient, for adding, editing, or viewing treatment plans.
***Refer to the Treatment Plans topic's Procedures section for detailed procedural information on the Treatment Plan screen.
|
|
1.) Select the patient in the grid for whom you wish to update an event.
2.) Select the Scheduled Events tab in the bottom half of the screen.
3.) Select the event you wish to update the status for on the bottom grid.
4.) Click on Update Status. This will open the Update Event Status window for the selected event, for updating the event's status.
5.) Refer to the 'How to Update a Scheduled Event's Status' procedure found in the Scheduler Review Events topic.
|
|
1.) Select the patient in the grid for whom you wish to add an event.
2.) Select the Scheduled Events tab in the bottom half of the screen.
3.) Click on Add Event. This will open the Scheduled Event window for the selected patient, for adding an event.
4.) Refer to the 'How to Schedule an Event' procedure found in the Scheduler Review Events topic.
|
|
1.) Select the patient in the grid for whom you wish to edit an event.
2.) Select the Scheduled Events tab in the bottom half of the screen.
3.) Select the event you wish to edit on the bottom grid.
4.) Click on Edit Event. This will open the Scheduled Event window for the selected event, for editing the event's details.
5.) Refer to the 'How to Edit a Scheduled Event' procedure found in the Scheduler Review Events topic.
|
|
1.) Select the patient in the grid for whom you wish to link a document.
2.) Select the Linked Documents tab in the bottom half of the screen.
3.) Click on Link Document. This will open the Link Document window, for linking a document to a patient.
4.) Follow the 'How to Link a Document to a Patient' procedure found in the Document Manager topic.
|
|
1.) Click on the 'Include Inactive Patients' checkbox. This will expand the list to include inactive patients.
1.) Select the inactive patient in the grid who you wish to reactivate.
3.) Click on Profile.
4.) Refer to the 'How to Reactivate a Patient' procedure found in the Patient Profile topic.
|
Deleting a Document Link
Pressing the Delete Document button while a document is selected under the Linked Documents tab does not delete the actual document, but only the link between that document and the patient.
Payment Information by Charge Amount
Caseload Summary by Provider
Dose Receipt - Require Patient to check in at the Front Desk