![]()
![]()
(Topic Last Updated On: 05/05/2010)
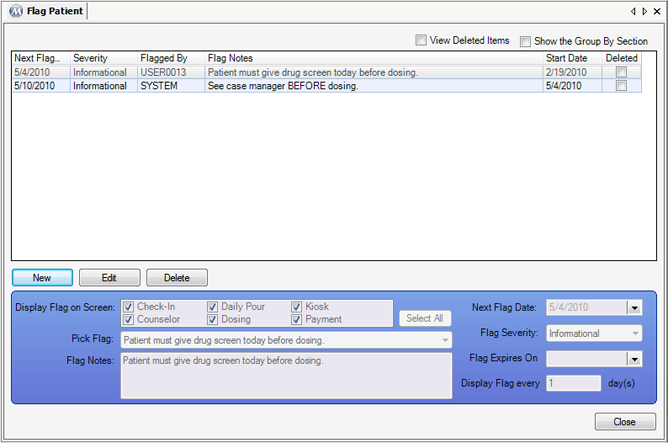
The Flag Patient menu item allows users to enter patient flags, to efficiently communicate messages to patients in one or more clinic areas. Users have detailed options when entering flags, including selecting where the flag should appear in the system, when it should appear, if or when it should expire, will it lock the patient from dosing until deleted, and will it display every day or in intervals. The Flag Messages window displays flags on various screens throughout the system, depending on the details selected when the flag is entered. Current patient flags are viewed, edited, added, and deleted on this screen. Flags are also available for selection on the Counselor Daily Activities window for performing these functions.

Display Flag on Screen
The selection made here determines on what screen or screens the flag message will appear. 'Payment' flags will appear on the Payments screen when the patient is retrieved. 'Dosing' flags will appear on the Dose Patient Screen. 'Counselor' flags will appear on the Daily Activities screen. 'Daily Pour' flags will appear on the Prepare Daily Pour screen. 'Check-In' flags will appear on the Check In screen. 'Kiosk' flags will appear at the self check-in kiosk workstation. If the Select All button is pressed and all boxes are checked, the flag will appear on all of these screens.
Pick Flag
This list contains preselected flags that are used on a regular basis and is customizable. Selecting a preselected flag will fill in the Flag Notes text field with the selected flag's text.
Flag Notes
This text field contains the text of the flag message that will appear on the Flag Messages screen when a patient is retrieved. Note that if a preselected flag was selected, text can then be added or removed as needed to the preselected flag text.
Next Flag Date
The date selected here is the date on which the flag message will begin to appear.
Flag Severity
The selected severity determines whether or not the patient will be locked out from dosing until the flag is deleted, and can also provide information to front desk personnel regarding how important the task to be completed is. 'Informational' flags display a question mark icon on the Flag Messages screen. 'Warning' flags display an exclamation point icon. 'Stop Dose' flags display a stop sign icon, and prevent the patient from dosing until the flag is deleted (Note: 'Stop Dose' flags will only stop a patient from dosing if set to display on the Dose Patient screen). 'Financial' flags display a money sign icon.
Flag Expires On
On the evening of the date selected here, Methasoft nightly processes will delete the flag. This field is optional and often left blank so that the flag message will appear indefinitely until it is deleted from the system by a user, which can ensure that patient absenteeism doesn't result in the flag being missed by staff.
Display Flag every ____ Day(s)
This number is set to '1' by default so that flags can appear each day for the date range entered. Entering a different number here will create an interval on which the flag will display. For example, if '7' is entered here, the flag will display on only one day a week, determined by the Start Date selected.
Next Flag Date
This column displays the 'Next Flag Date' selected for each flag, which is the date on which each flag is scheduled to appear next.
Flagged By
This column displays the 'Employee ID' (User ID) of the user who entered the flag.
Start Date
This column displays the date each flag was scheduled to appear on first, which is the original 'Next Flag Date' selected at the time the flag was initially saved in the system.
Deleted
This column displays a checkmark for flags that have been deleted from the system. Deleted flags will only appear if the View Deleted Items checkbox is checked at the top of the grid.
Patient Attendance Schedule Changes
If a patient's attendance schedule changes after a flag has been entered in the system, users may need to edit the previously entered flag or risk the flag being missed by the patient.
Scheduling too Far in Advance
It is because of the consideration above that it is recommended you don't flag patients too far out in the future. Entering flags only for the upcoming month out is a good rule of thumb.
Entering Stop Dose Flags
When a flag with a Stop Dose severity is entered for a patient and set to appear on the Dose Patient screen, that patient will be prevented from dosing in the system until the flag is either deleted, or edited to a lower flag severity. Thus, these flags should be considered carefully and used as minimally as possible. For example, a counselor going on vacation for two weeks can cause unnecessary headaches for the rest of the staff by scheduling multiple Stop Dose flags for his caseload during the two weeks he will be gone and unable to address them as the patients are stopped.
Stop Dose Flags Entered to Appear at the Self Check-In Kiosk
When a flag with a Stop Dose severity is entered for a patient and set to appear on the Kiosk workstation, that patient will be prevented by the system from checking in at the Kiosk.
Deleting Flags
Flags can be deleted by any user with appropriate security access, regardless of who they are entered by. Flags can be deleted on this screen, the Daily Activities screen, or directly from the Flag Messages window on which they're displayed.