![]()
![]()
(Topic Last Updated On: 05/05/2010)
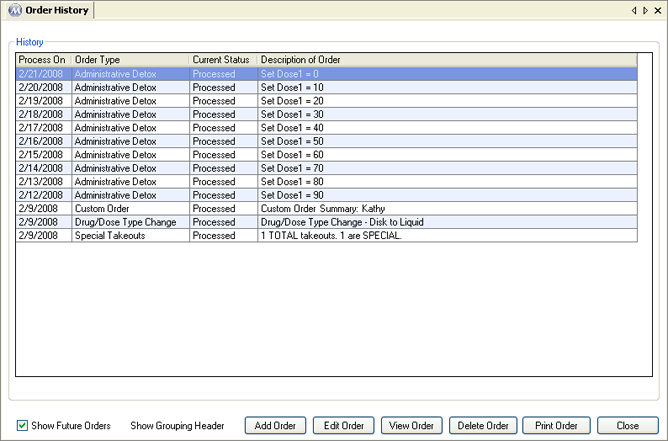
The Order History menu item on the Pharmacy menu launches the Order History screen, which is used to review patient order histories, as well as orders scheduled to take effect in the future. This allows staff members to quickly retrieve and view what types of orders have been entered, cancelled, or processed for each patient, and when. Furthermore orders can be added, viewed, edited, deleted, and printed directly from this screen by using the command buttons at the bottom.

Show Future Orders
Checking this checkbox will display all Pending orders scheduled for the retrieved patient.
Process On
This column displays the 'Process On', or 'Start On' date for each order, which is the date each order was processed or is scheduled to process on.
Order Type
This column displays the type of each order. Order types appearing in this column include 'Dosage Change', 'Drug/Dose Type Change', 'Schedule/Phase Change', 'Special Takeouts', 'Custom Order', 'Administrative Detox', 'Financial Detox', 'Voluntary Detox', 'Titrate Up', and 'Custom Titrate/Detox'.
Current Status
This column displays the current status of each order. Order statuses appearing in this column include 'Pending' (the order is scheduled to take effect on the Process On date), 'Cancelled' (the order was cancelled by a user or system nightly processes), or 'In Progress' (part of the order has been processed, part of the order remains pending, in the cases of multi-part Dosage Change or Titrate/Detox orders).
Description of Order
This column displays a summary of each order's detail information.
Add Order
Pressing this button will open the Orders window, for entering a new order for the retrieved patient.
EDit Order
After selecting an order in the grid, pressing this button will open the Orders window with the details of the selected order available for editing.
View Order
After selecting an order in the grid, pressing this button will open the Orders window displaying the details of the selected order.
Delete Order
After selecting an order in the grid, pressing this button will open the Delete Order? message box, confirming you want to delete the selected order. Pressing Yes on this message then deletes the order.
Print Order
After selecting an order in the grid, pressing this button will print the selected order to the configured printer.
|
1.) Select the order you wish to view on the grid.
2.) Click on View Order. This will open the Orders window displaying the selected order's detail information.
|
|
1.) Select the order you wish to print on the grid.
2.) Click on Print Order. This will print the selected order to the configured printer.
|
Orders Showing Up in Order History
All orders entered on the Orders or Titrate/Detox Order screens will appear on this screen unless deleted from the system. Many facilities will save Dosing Information changes directly on the Dosing Information screen, based on a manual physician's order - doing so will not insert an entry into the patient's Order History. It is important for facilities to maintain consistent procedures for entering patient orders in the system, to prevent inconsistencies between Dosing and Order Histories, or among each patient's Order History. This also applies to last-minute verbal orders granted by changing data for one dosing visit on the Dose Patient screen - these overrides do not generate an order in the system that will appear on this screen.