![]()
![]()
(Topic Last Updated On: 05/05/2010)
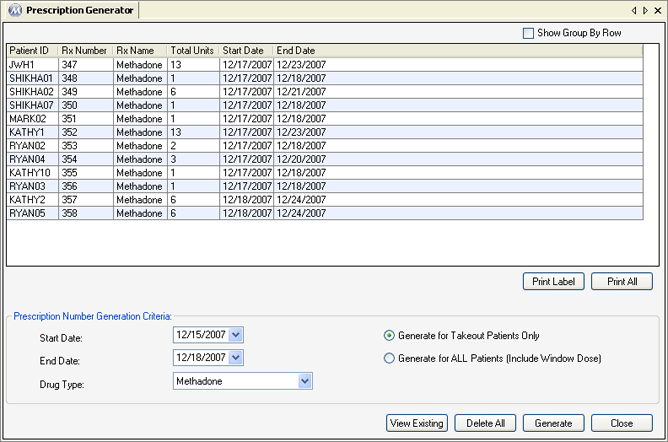
The Prescription Generator menu item on the Pharmacy menu launches the Prescription Generator screen, which is used to generate large batches of prescriptions for multiple patients at once. Users can enter a date range to generate prescriptions for any selected drug type, then choose to generate prescriptions for all patients or for only patients with takeout privileges. When prescriptions are generated the system looks for patients scheduled to attend through the selected date range, then generates unique prescription numbers accordingly for each patient, with appropriate date ranges based on attendance schedules. Some facilities use this screen to generate prescriptions for one day at a time, so that each batch of takeouts leaving their facility has a unique prescription number. Additional features include the ability to print prescription labels for all displayed prescriptions, or a selected prescription. Prescriptions can also be deleted on this screen. All prescriptions generated using this screen will appear for each patient on the Prescription Information screen, where they can be edited or deleted.

Start Date
The date selected in this field determines the start date for the date range prescriptions will be generated for.
End Date
The date selected in this field determines the end date for the date range prescriptions will be generated for.
Drug Type
The drug type selected here determines for which drug type prescriptions will be generated. Prescriptions will be generated only for patients on the selected drug type, as saved in each patient's Dosing Information.
Generate for Takeout Patients Only
If this option is selected, prescriptions will only be generated for patients attending during the selected date range who receive takeout medication.
Generate for ALL Patients (Include Window Dose)
If this option is selected, prescriptions will be generated for all patients attending during the selected date range.
Rx Number
This column displays the unique 'Rx Number' assigned to each prescription.
Rx Name
This column displays the 'Rx Drug Type' of each prescription.
Total Units
This column displays the total number of doses each prescription covers.
Start Date
This column displays the 'Rx Start Date' of each prescription.
End Date
This column displays the 'Rx End Date' of each prescription.
View Existing
Once a date range and drug type are selected, pressing this button will display any prescriptions in the system that have a matching drug type and a start date within the selected date range.
Delete All
This button remains disabled until one or more prescriptions appear on the grid. Pressing this button will delete any prescriptions displayed on the grid.
Generate
Once a date range and drug type are selected, and an option is selected for all patients or only takeout patients, pressing this button will generate the batch of prescriptions.
Print Label
This button remains disabled until one or more prescriptions appear on the grid. Once a prescription in the grid is selected, pressing this button will send the prescription's label to the configured printer.
Print All
This button remains disabled until one or more prescriptions appear on the grid. Pressing this button will send a prescription label to the configured printer for each description displayed.
|
1.) Select the prescription you wish to print a label for on the grid.
2.) Click on Print Label.
|
Prescription Numbers Required on Dose Labels
The most common use for this screen is for generating prescriptions for Methadone so that unique prescription numbers will appear on takeout dose bottle labels.
Prescription Labels
Some facilities are required to print a separate batch of prescription labels to be signed off by the MD. These labels resemble Multiple Takeouts/Bottle dosing labels, and display the Start and End Dates, the number of doses covered by, and drug type of each prescription.
Overlapping Date Ranges for Prescriptions of the Same Drug Type are Not Allowed
Methasoft prevents users from entering or generating prescriptions for the same drug type that have overlapping date ranges. If conflicting prescriptions exist at the time a batch is being generated, an application message will appear informing users that there are already existing prescriptions for the selected drug type and date range that have to removed first before the new batch can be generated. The same prevention is in place on the Prescription Information
Prescription Information Screen
Generated prescriptions will appear on the Prescription Information screen for each patient. Each generated prescription's Rx Number, Drug Type, Start Date, End Date, and Expiration Date will appear on this screen, as well as an Rx Comment noting the total number of doses or takeouts the prescription covers. Generated prescriptions can be edited or deleted on this screen. This screen also allows for entering additional prescriptions for patients as needed when batches have already been generated.