![]()
![]()
(Topic Last Updated On: 05/05/2010)
The Check In menu item on the Accounting menu launches the Check In screen, which is used to check patients in for dosing in lieu of using the Patient Payments screen. This screen is used in facilities where accounting staff are separate from staff checking patients in, to prevent unauthorized access to accounting information and functions. It is also used in some facilities on the weekends when accounting staff is not available to check patients in. This screen displays basic patient information and photos, will display Flag Messages, allows for Quick Dosing Flag entry, as well as easy access to printing ID cards, drug screen labels, or entering new scheduled events.
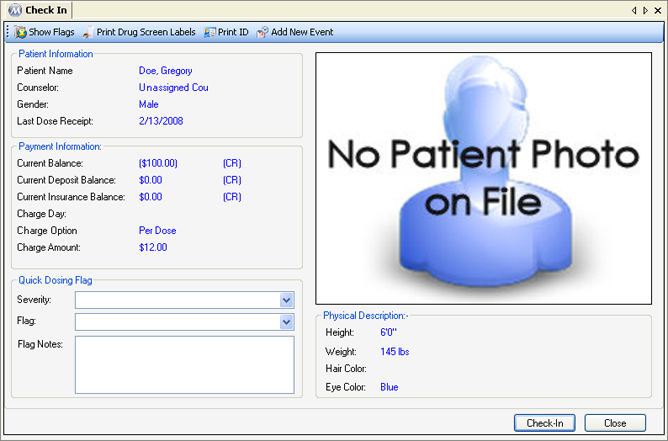
Patient Name
This field displays the name of the patient currently retrieved.
Counselor
This field displays the counselor assigned to the patient currently retrieved.
Gender
This field displays the gender of the patient currently retrieved.
Last Dose Receipt
The field displays the date of the last time the retrieved patient was checked in for dosing.
Current Balance
The field displays the retrieved patient's current Patient balance.
Current Deposit Balance
The field displays the retrieved patient's current Deposit balance.
Current Insurance Balance
The field displays the retrieved patient's current Third-Party, or Insurance balance.
Charge Day
This field displays the day of the week or month the retrieved patient's Patient balance is charged for services. Nothing will appear in this field if the 'Per Dose' Charge Option is being used.
Charge Option
This field displays the retrieved patient's Patient balance Charge Option, 'Per Dose', 'Per Week', 'Per Month', 'Semi-Monthly', or '4x/Month (Mon)'.
Charge Amount
This field displays the retrieved patient's Patient balance Charge Amount.
Severity
This field is used for selecting a Quick Dosing Flag's severity level. Available severity types are the same as on the Payment Information and Flag Patient screens, including 'Informational', 'Warning', 'Financial', and 'Stop Dose'.
Flag
This field is used for selecting a preselected flag when entering a Quick Dosing Flag. Available selections include all entries in the Preselected Flags code table.
Flag Notes
This field displays the text of the flag message when entering a Quick Dosing Flag. If a preselected flag is selected, it's text will be automatically inserted into this field. If '(Other)' is selected in the Flag field, then the text of the flag message is typed in this field.
Height, Weight, Hair Color, Eye Color
These fields display the retrieved patient's physical description, as saved for each patient on the Patient Profile screen.
Show Flags
Pressing this button will display the Flag Messages window, displaying any flag messages for the retrieved patient. When applicable, the Flag Messages window appears automatically when a patient is retrieved on this screen, but this button allows you to re-open the window if necessary.
Print Drug Screen Labels
Pressing this button will generate a drug screen label for the retrieved patient, and send the label to the printer designated for drug screen labels.
Print ID
Pressing this button will print a Patient ID Card for the retrieved patient to the configured printer.
Add New Event
Pressing this button will bring up the Scheduled Event window with the retrieved patient automatically selected as an attendee, for scheduling a new event for the patient.
Check-In
Pressing this button will give the retrieved patient a dose receipt, checking the patient in for dosing. The patient will be added to the Dosing Queue if applicable in your facility.
|
1.) Once a patient is retrieved on this screen, click on Check-In.
|
Make Sure Flag Messages are Entered Appropriately to Appear on this Screen
If your facility is using this screen to check in patients, solely or intermittently (for example, on the weekends only), it is important that all staff is aware of selecting the 'Display Flag on Screen' selection correctly when entering flags on the Flag Patient screen. A common problem in such facilities is that flags are missed because they are set to display on the Patient Payments screen when the Check In screen is being used.
Dose Receipt - Require Patient to check in at the Front Desk