![]()
![]()
(Topic Last Updated On: 04/19/2018)
Other Activities > Digital Signing
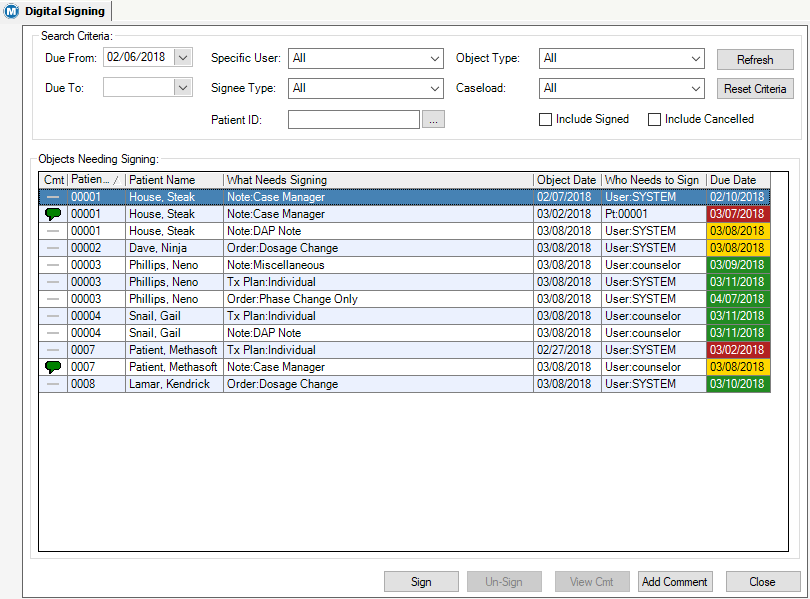
The Digital Signing screen is accessed by clicking the Digital Signing item on the Other Activities menu. This screen is used for digitally signing objects that have signature details configured in the Digital Signature Setup screen. From this screen user can digitally sign and un-sign objects, locate objects that have been signed or cancelled, and add/view comments attached to objects. The Digital Signing feature of Methasoft requires additional setup and training. Contact Methasoft Support for more details.
Due From
This field contains a calendar date selection menu. The date selected here is the beginning date used when filtering the objects in the grid.
Due To
This field contains a calendar date selection menu. The date selected here is the end date used when filtering the objects in the grid.
Specific User
This dropdown menu field contains a list of all employees (users). The objects displayed in the grid, belong to the user selected from this menu.
Object Type
This dropdown menu field contains a list of all digital signature object types. The selection made here will isolate the objects in the grid by that object type.
Signee Type
This dropdown menu field contains a list of all digital signature signee types. The selection made here will isolate the objects in the grid by that signee.
Caseload
This dropdown menu contains a list of employees how are assigned to the 'Counselors' job role under the Employee Profile screen. The user selected here is who's signing objects are to display in the grid.
Patient ID
This field is used to enter in a patient's ID. The patient ID entered here will isolate the objects displayed in the grid to objects that belong specifically to that patient.
Include Signed
This checkbox field is used to include already signed objects in the grid.
Include Cancelled
This checkbox field is used to include cancelled digital signing objects in the grid.
Comment
User entered comments display in this field. This field appears in the 'Add Signature Comment', 'View Signature Comment', and 'Batch Digital Signing', and windows.
Cmt
This column displays a 'comment' icon  if the signing object has
an added comment.
if the signing object has
an added comment.
Patient ID
This column displays the ID of the patient associated with the signing object.
Patient Name
This column displays the name of the patient associated with the signing object.
What Needs Signing
This column displays the digital signing object type.
Object Date
This column displays the date the signing object was created.
Who Needs to Sign
This column displays the specific user, job role, or patient ID of the signee required to sign the object.
Due Date
This column displays a color-coded date that the object is due to be signed. The due date is specific to the signee and configured using the 'Object Details' settings on the Digital Signature Setup screen. *See the Digital Signature Setup topic for more information.
Red = The object is past due and needs to be signed.
Yellow = The object is due today.
Green = The object is due on the future.
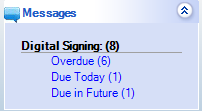
The 'Messages'  section
of the 'Navigation' panel displays an object count showing the user how
many objects they have to sign. The message pane shows how many objects
need to be signed in total, how many are overdue, how many are due today,
and how many are due in the future. Selecting any of these links will
launch the Digital Signing screen.
section
of the 'Navigation' panel displays an object count showing the user how
many objects they have to sign. The message pane shows how many objects
need to be signed in total, how many are overdue, how many are due today,
and how many are due in the future. Selecting any of these links will
launch the Digital Signing screen.
Signed Date/Time
This column appears when the option for 'Include Signed' is checked. This column displays the date and time that the object was digitally signed.
Signed By
This column appears when the option for 'Include Signed' is checked. This column displays the specific user, job role, or patient ID the signee.
Cancel Date
This column appears when the option for 'Include Cancelled' is checked. This column displays the date the object was cancelled.
Cancelled By
This column appears when the option for 'Include Cancelled' is checked. This column displays the user that cancelled the object.
Cancel Reason
This column appears when the option for 'Include Cancelled' is checked. This column displays the user entered comment for canceling the signing of the object.
Refresh
After making all search criteria selections, clicking this button isolates the objects in the grid based on the selections made.
Reset Criteria
This button resets the search criteria fields.
sign
This button opens the 'Batch Digital Signing' detail window.
UN-Sign
After a signed object is selected, this button will appear as clickable. This button will void all signatures attached to the signing object.
View Comment
After selecting a signing object that has an attached comment icon, this button will appear as clickable. This button opens the 'View Signing Comments' dialog box. The comment and date/time it was entered can be viewed from this box.
Add Comment
This button opens the 'Signature Comment' dialog window. From this window, users can enter in a comment to be attached to the selected object.
Close
This button closes the Digital Signing screen.
There are two ways to sign an object from the Digital Signing screen:
1.) The first way is to double-click the object that you want to sign from the grid. Depending on how the signature details are configured for that signee in the Digital Signature Setup Details screen; a NumPad, Password Validation, or Signature Capture box will appear.
a.) Enter the required credentials. b.) A confirmation box will appear verifying that the object was successfully signed. Click ok.
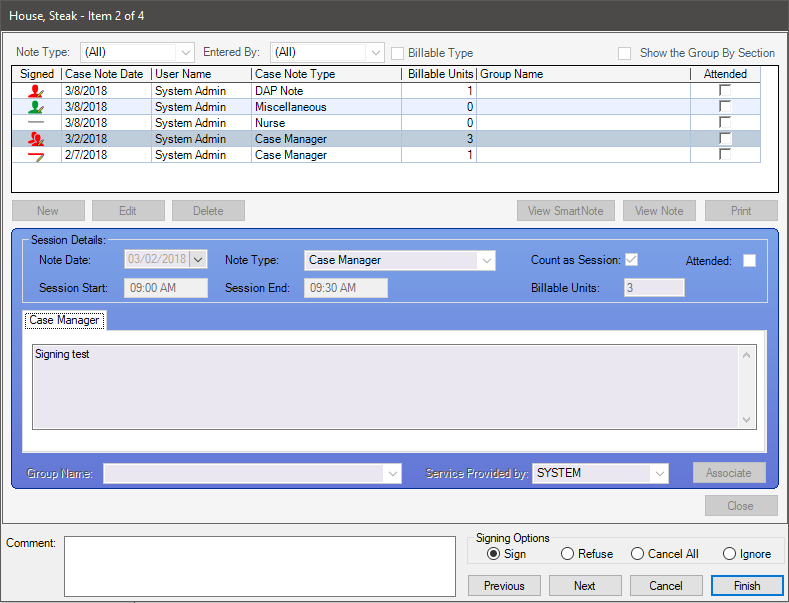
2.) The second way to sign an object, is by using the 'Batch Digital Signing' feature. Batch digital signing is a security driven feature that is typically reserved for doctors. This feature is incredibly useful when needing to review and sign a large number of objects at once. Click on the sign button. This will open the 'Batch Digital Signing Detail' application window.
a.) From this window, users can review each specific object in detail, and select a signing option for each object in the batch. How to read this screen:
Signing Options
Sign = This is the default selected option. This option indicates that the object has been reviewed and the users signature will be attached to this object when the batch is finished.
Refuse = Selecting this option indicates that the object will be refused and no signature will be attached. This option is chosen when there is an issue with the details of the object that need to be corrected before signing. Refused objects require a comment to be entered in the comment box, detailing why the object is being refusing. Once the object has been refused, the comment icon will appear where other users can see the comment and make needed corrections. The object will return back to the first signee's digital signing queue for changes to be made.
Cancel All = Cancel is a feature that is rarely used and needs to be treated with caution. When an object is cancelled, it removes the document from digital signing all together. The document still exists in the system, but the object will be removed permanently from digital signing. The ability to use this option requires a combination of security privileges. *See Related Security Options below.
Ignore = Selecting the ignore option means the object is being skipping over in the current batch. It will remain in the digital signing queue to be signed at a later time.
b.) To sign the object, select the 'Sign' radio button option. c.) Click Next to move to the next object in the batch. d.) Assign a 'signing option' to each object in the batch. e.) At any point in the batch, or after all objects have been reviewed and a signing option assigned, click finish. f.) This will only apply the selected signing actions. Remaining objects in the batch will be ignored and remain in the digital signing queue. g.) The Pre-Captured (PIN Validation) NumPad will pop-up. Enter in the pre-captured PIN number using the on-screen NumPad or the computers keyboard. h.) Press the 'enter' key on the keyboard, or click Submit on the on-screen NumPad pop-up box to complete the signing process for the batch.
|
1.) The ability to Un-Sign a digitally signed object is a security driven privilege. *See Related Security Options below.
2.) (Optional) Make specific search criteria selections to best isolate the grid results to display the specific object needing to be un-signed.
3.) Check the box to the left of 'Include Signed'.
4.) Click the refresh button.
5.) Locate and select the object from the 'Objects Needing Signing' grid.
6.) Click on the Un-Sign button.
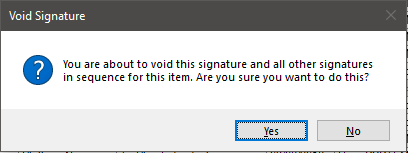
7.) A 'Void Signature' dialog box will pop-up.
8.) Click YES if you are sure you want to void all signatures associated with this object. This will return the object to the original signee's digital signing queue.
|
1.) The ability to cancel an object from digital signing requires a combination of security privileges. *See Related Security Options below.
2.) (Optional) Make specific search criteria selections to best isolate the grid results to display the specific object needing to be cancelled.
3.) Click the refresh button.
4.) Locate and select the object from the 'Objects Needing Signing' grid.
5.) Click on the sign button. This opens the 'Digital Signing' detail application window.
6.) Select the 'Cancel All' signing option radio button.
7.) (Required) Enter a detailed reason for the cancellation into the 'Comment' textbox. Cancellation comments show in the 'Cancel Reason' column on the 'Object Needing Signing' grid.
8.) Click Finish. This will close the application window, attach the comment to the object, and mark the selected object as cancelled.
|
Prerequisites to Utilize the Digital Signing Feature
There are a number of required prerequisites that need to be met before the Digital Signing feature can be utilized. Contact Methasoft Support to have these requirements completed.
Topaz electronic signature pads need to be installed and setup.
Digital Signing training webinar needs to be completed with Methasoft Support.
Digital Signing preferences and settings needs to be enabled by Methasoft Support.
Digital Signature Setup rules are required to control what and how objects are signed.
Employees digital signature must be pre-captured and a PIN assigned.
Security privileges, specific to Digital Signing, have to be assigned to users.
Main Preferences > Paperless Preferences > General Paperless Setup
Main Preferences > Paperless Preferences > Signatures Due Flags
Report Preferences > Adding 'ForSigning'
Security Administration > Screen > Access to Digital Signing