![]()
![]()
(Topic Last Updated On: 05/05/2010)
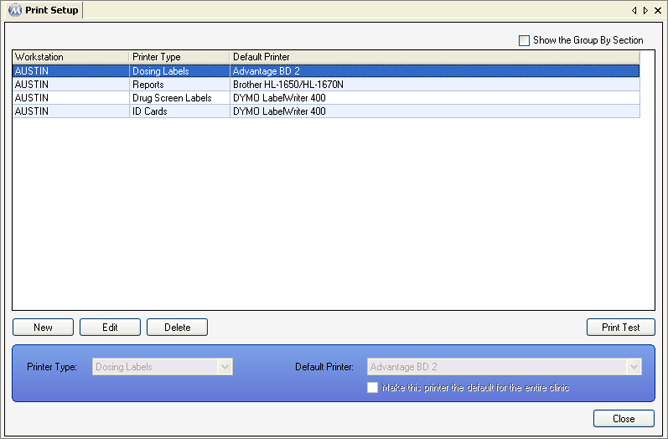
The Print Setup menu item on the File menu launches the Print Setup screen, which is used to configure the printers on which different items will be printed from Methasoft for each computer workstation. This allows facilities to configure which printers will print bulk barcode labels, dosing labels, drug screen labels, patient ID cards, inventory labels, order labels, payment receipts, reports, and prescription labels from each workstation in the facility.

Printer Type
The type of Methasoft item you are configuring printing for is selected in this field. Available selections include 'Bulk Barcode Labels' (for facilities using barcode scanners to open and switch bulk bottles), 'Dosing Labels' (for in-house and/or takeout bottles), 'Drug Screen Labels' (for patient drug screen specimen bottles), 'ID Cards' (for facilities printing patient ID cards), 'Inventory Labels' (for labelling each bottle in facilities preparing large batches of unassigned unit doses ahead of time), 'Order Labels' (for facilities printing patient orders on labels, which are then applied to an order sheet in each patient's chart), 'Receipts' (for printing payment receipts), 'Reports' (for printing reports), and 'Rx Labels' (for facilities tracking Methadone prescription numbers, these labels are applied to a sheet later signed by the physician).
Default Printer
This field is used for selecting the printer on which items of the selected 'Printer Type' will be printed. Available selections include all printers installed on the workstation.
Make this printer the default for the entire clinic
If this field is checked for a 'Printer Type'/'Default Printer' combination, the items of the selected 'Printer Type' will be printed to the selected 'Default Printer' from all workstations in the facility.
Workstation
This column displays the name of the computer workstation for which each print setup entry applies.
Printer Type
This column displays the 'Printer Type' selected for each print setup entry.
Default Printer
This column displays the 'Default Printer' selected for each print setup entry.
Print Test
Once a print setup entry has been selected on the grid, pressing this button will send a test page to the 'Default Printer' selected, for testing that a printer has been properly installed and configured.
|
1.) Select the print setup entry to be edited on the grid.
2.) Click on Edit.
3.) Make changes as needed to data in the detail section of the screen.
4.) Click on Save.
|
Printer Software Must Be Installed
Printers will not appear available for selection in the 'Default Printer' field until the printer's software has been successfully installed, after which the printer will appear in the Windows Control Panel - Printers and Faxes.
Label Preferences Must Be Configured Correctly
This screen only dictates to which printer an item will be printed from a specific workstation. Printing will fail unless Label Preferences are configured correctly for all 'Printer Type(s)' used at your facility.
Make this printer the default for the entire clinic
This field is generally only used for the 'Reports' printer type, in facilities where users are sharing one network printer.