![]()
![]()
(Topic Last Updated On: 05/05/2010)
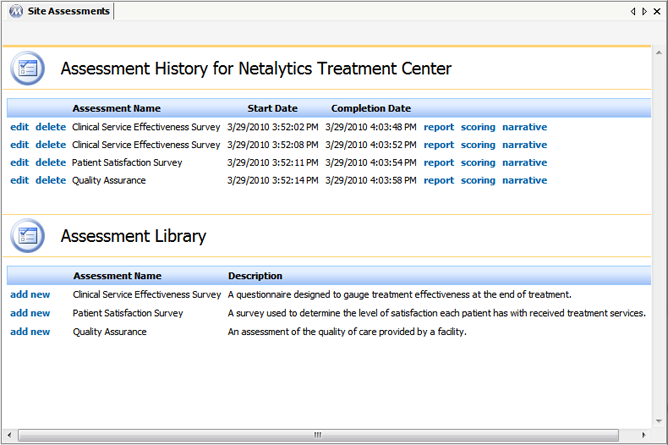
The Site Assessments menu item on the Assessments menu launches the Site Assessments screen, which is used to view, modify and add site assessments. Some site assessments are delivered with Methasoft, but all are fully customizable using the Assessment Wizard functionality, which allows full customization of existing assessments and functionality for building new ones. When the Site Assessments screen is opened, the Home Site's Assessment History is displayed, showing all previous site assessments saved for the facility. The Assessment Library is displayed below the site's assessment history, for adding a new site assessment. Assessments are divided up into Modules containing groups of related questions. Once the last module has been completed, the Mark As Complete button saves the completed assessment and marks it as completed. Site Assessments are not tied to a Patient ID, but instead only to the Home Site - thus it does not matter if or which patient is retrieved when a Site Assessment is entered.

The Site Assessments screen

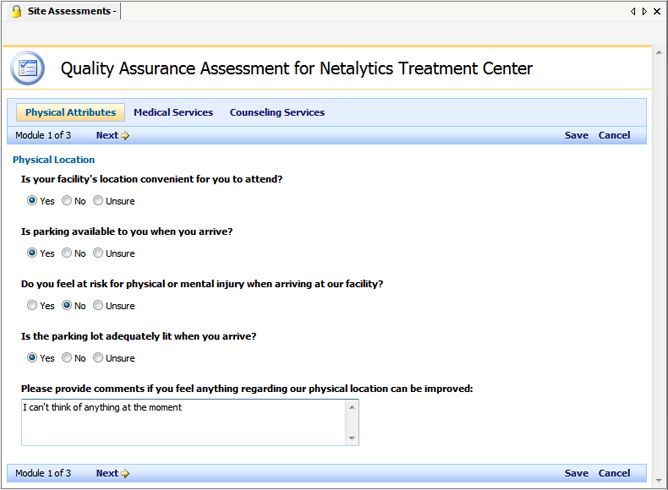
The first module, 'Physical Attributes' of a Quality Assurance Assessment

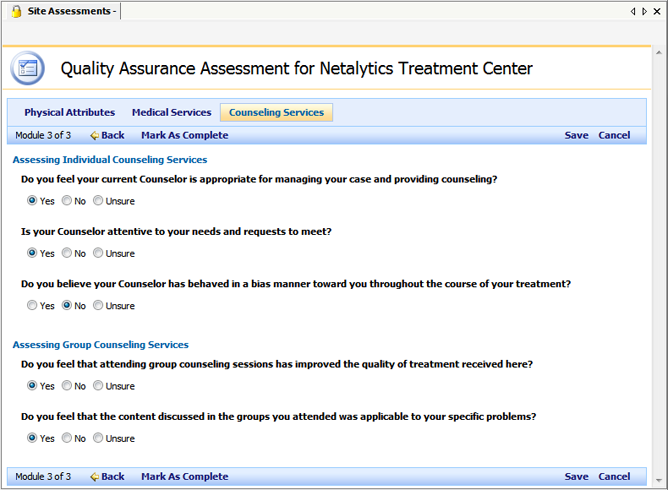
The last module, 'Counseling Services' of a Quality Assurance Assessment
Assessment History for (Site Name)
This section of the screen displays all site assessments that have been saved for the Home Site. Assessments that have not been completed will appear without a 'Completion Date'.
Assessment Library
This section of the screen displays all assessments that can be added by the current user for the Home Site. Available assessments include all of those delivered with Methasoft and any built using the Assessment Wizard screen, provided the user has security access to each assessment on the Security Administration screen ('Object Type' - Assessment).
Assessment Name
This column displays name of each assessment, as defined on the Assessment Wizard screen.
Start Date
This column displays the date and time each assessment was initially saved in Methasoft without using the Mark As Complete button.
Completion Date
This column displays the date and time each assessment was completed, using the Mark As Complete button.
Description
This column displays each assessment's description, as defined on the Assessment Wizard for each assessment.
edit
Pressing this button beside an assessment under a site's Assessment History will open the assessment for editing.
delete
Pressing this button beside an assessment under a site's Assessment History will open a Windows Internet Explorer application message, confirming you want to delete the adjacent assessment. Clicking on OK then deletes the assessment and refreshes the site's Assessment History.
report
Pressing this button beside an assessment under a site's Assessment History will open the report for the adjacent assessment on an instance of the assessments report screen, which displays the assessment in report form and provides printing and export options.
scoring
Pressing this button beside an assessment under a site's Assessment History will open the scoring summary for the adjacent assessment on an instance of the assessments scoring screen, which displays a scoring summary for all applicable data.
add new
Pressing this button beside an assessment under the Assessment Library will open a new instance of the assessment for the Home Site.
Next>
Pressing this button while entering an assessment opens the next module of the assessment.
<Back
Pressing this button while entering an assessment opens the previous module of the assessment.
Save
Pressing this button at any point while entering an assessment will save the assessment, but will not mark it as completed with a 'Completion Date'.
Mark As Complete
This button only appears once the last module of an assessment has been reached. Pressing this button will save the assessment and mark it as completed with a 'Completion Date'.
Navigating Among Modules
The modules of an assessment are listed across the top of the screen when an assessment is being entered. Besides using Next> and <Back to navigate modules, a module can also be selected directly from the top by clicking on it.
Mark As Complete vs. Save
Generally the Mark As Complete button is only used when an assessment is completed. The Save button is generally used instead of Mark As Complete when an assessment is only partially finished, or when editing after an assessment is completed to avoid updating the 'Completion Date'.
Required Fields
Fields on each assessment can be configured on the Assessment Wizard to be required. When this is true, the system will not let you proceed to the next module until the required data has been entered. If the assessment only contains one module, the system will not let you save the assessment until the required data is entered.