![]()
![]()
(Topic Last Updated On: 05/05/2010)
The Assessment Wizard menu item on the Other Activities menu launches the Assessment Wizard screen, which is used to create new fully-customizable assessments, modify existing assessments, and export or import assessments. Patient assessments are assessments designed to collect information specific to a retrieved patient. Site assessments are designed to collect information specific to your Home Site. SmartNotes are also created using the Assessment Wizard screen, and are designed for more sophisticated case note entry on the Case Notes and Group Notes screens. Methasoft Assessments are divided into Modules, then Question Groups, then Questions and Responses. Responses can be entered to include Response List Items, allowing for virtually every type of response needed by any facility. Common types of Assessments are delivered with Methasoft at the time of installation, including numerous commonly used Questions and Responses that can be easily selected for use on other created or modified assessments. Questions and Responses can be shared with other assessments or limited to a particular assessment. Scoring values can be entered allowing assessments to be scored. Numerous layout options allow users to layout each assessment in any virtually any necessary format. The Export and Import functions allow users to easily export assessments to an XML format which can then be imported into Methasoft at other facilities, allowing multi-facility organizations to build each necessary assessment only once.
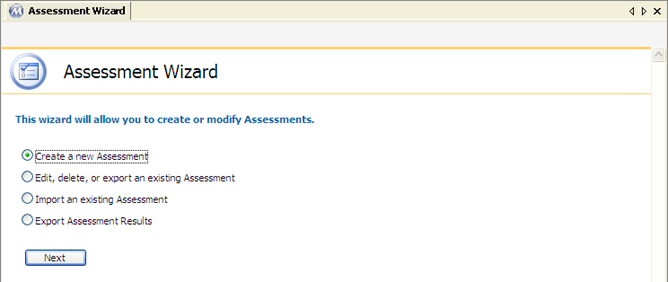
Assessment Wizard Home Page - Field Descriptions
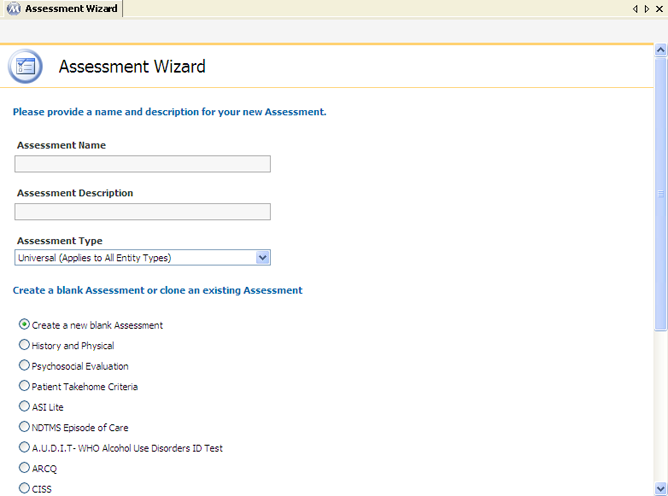
Create a new Assessment
This option is selected to create a new assessment, and pressing Next with this option selected opens the screen shown above for entering the new assessment's name and description. Options to create a new blank assessment or clone an existing assessment are provided as well.
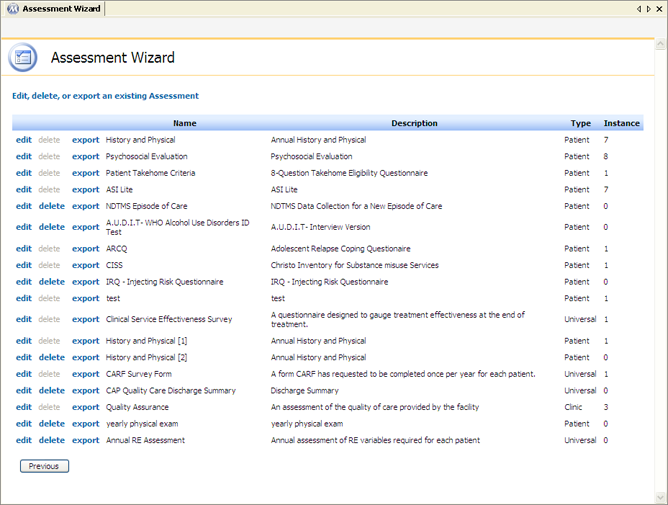
Edit, delete, or export an existing Assessment
This option is selected to edit, delete or export an existing assessment, and pressing Next with this option selected opens the screen shown above for selecting the desired action and assessment. Pressing the edit, delete, or export button adjacent to an assessment then either opens the assessment for editing, confirms the user wants to delete the assessment, or launches assessment export functionality. Once an assessment has been saved on the Patient Assessments or Site Assessments screen, it cannot be deleted unless all saved instances are deleted first.

Import an existing Assessment
This option is selected to import an existing assessment in XML format to make it available for use on the Patient Assessments or Site Assessments screen(s). Pressing Next with this option selected opens the screen shown above for selecting an assessment to import.
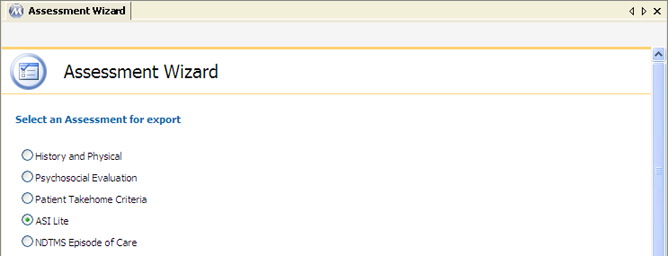
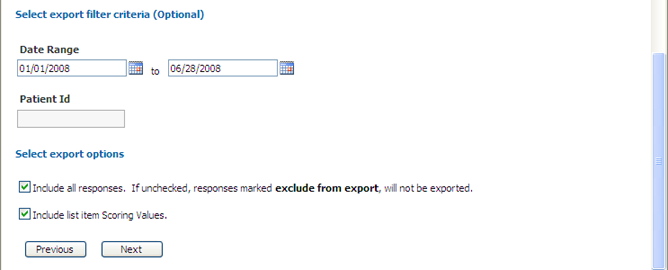
Export Assessment Results
This option is selected to export saved assessment results in Microsoft Excel XLS format. Pressing Next with this option selected opens the screen shown above for selecting the assessment results to export, as well as enter criteria to limit the scope of the data being exported.
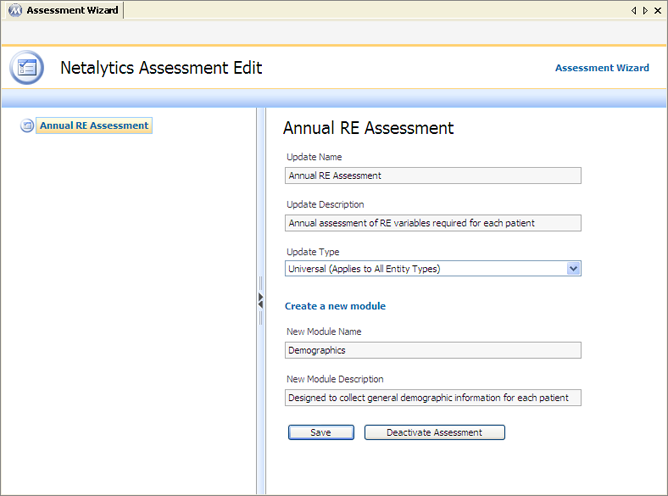
Update (Assessment) Name
This field is used for entering the name of the assessment.
Update (Assessment) Description
This field is used for entering a short description of the assessment.
Update (Assessment) Type
This field is used for selecting the type of the assessment. Available selections include 'Universal (Applies to Patient and Site Assessment Types)' (will be available on both the Patient and Site Assessments screens), 'Patient Assessment' (will only be available on the Patient Assessment screen), 'Site Assessment' (will only be available on the Site Assessments screen), and 'SmartNote' (will only be available for selection on the Case Note Templates screen, for association with a selected Case Note Type).
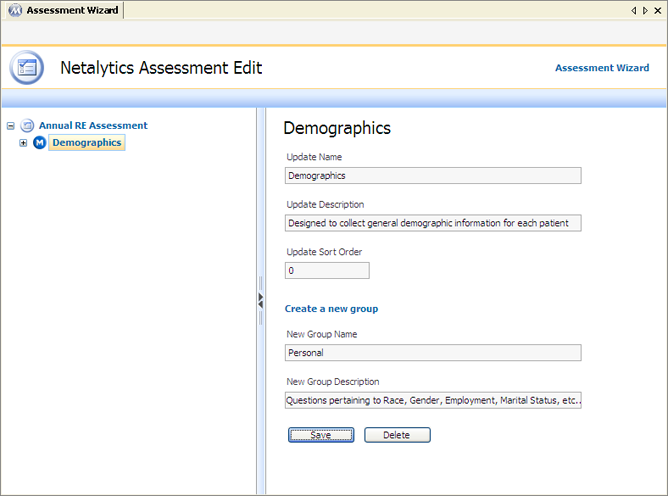
Update (Module) Name
This field is used for entering the name of the module.
Update (Module) Description
This field is used for entering a short description of the module.
Update (Module) Sort Order
This field is used to change the sort order of the module. By default this value is set to '0', and modules are placed in the order in which they are created. Modules can be re-arranged by changing this value to '1' or higher, causing them to be sorted in ascending order.
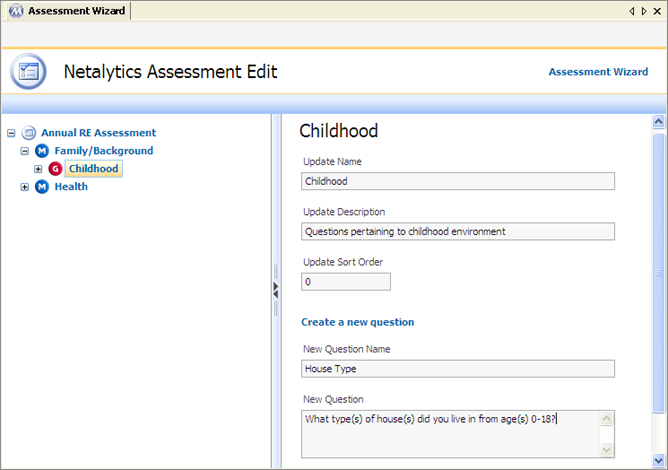
Question Group Field Descriptions
Update (Question Group) Name
This field is used for entering the name of the question group.
Update (Question Group) Description
This field is used for entering a short description of the question group.
Update (Question Group) Sort Order
This field is used to change the sort order of the question group. By default this value is set to '0', and question groups are placed in the order in which they are created. Question groups can be re-arranged by changing this value to '1' or higher, causing them to be sorted in ascending order.
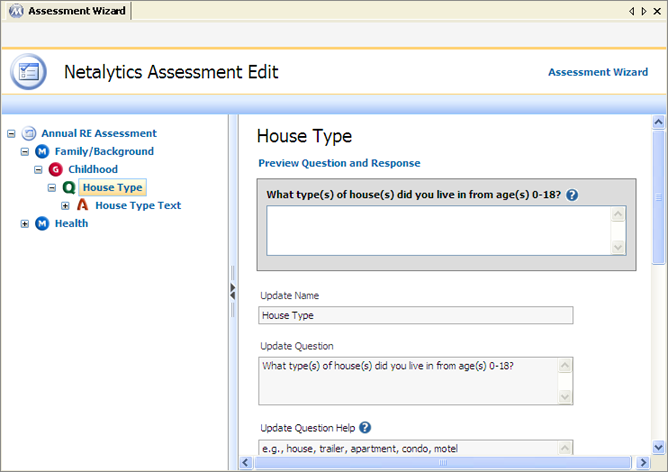
Preview Question and Response
This frame displays a preview of what the selected question will appear like on the assessment form.
Update (Question) Name
This field is used for entering the name of the question.
Update Question
This field is used for entering the question text.
Update Question Help
This field is used for entering the text that will appear in a tool-tip if a user hovers over the ![]() icon adjacent to the question.
icon adjacent to the question.
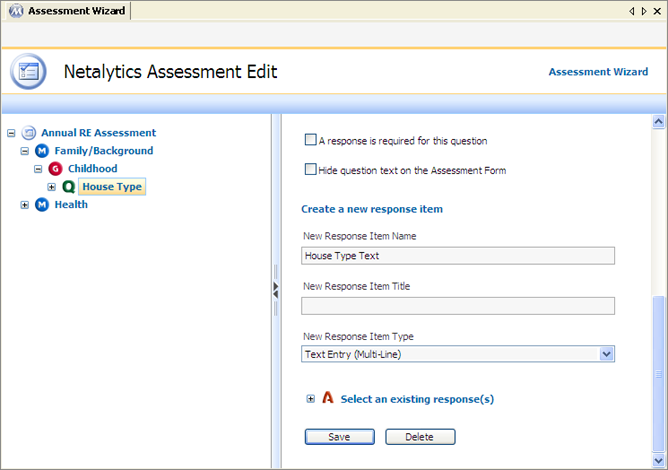
Update (Question) Sort Order
This field is used to change the sort order of the question. By default this value is set to '0', and questions are placed in the order in which they are created. Questions can be re-arranged by changing this value to '1' or higher, causing them to be sorted in ascending order.
A response is required for this question
This field is used to require a response to be entered for the question when the assessment is administered. If this checkbox is checked, users will be unable to proceed to the next module of the assessment until a response has been entered.
Hide question text on the Assessment Form
This field is used when designing certain types of question/response formats on an assessment. If this checkbox is checked, the 'Question' text will not appear on the assessment form.
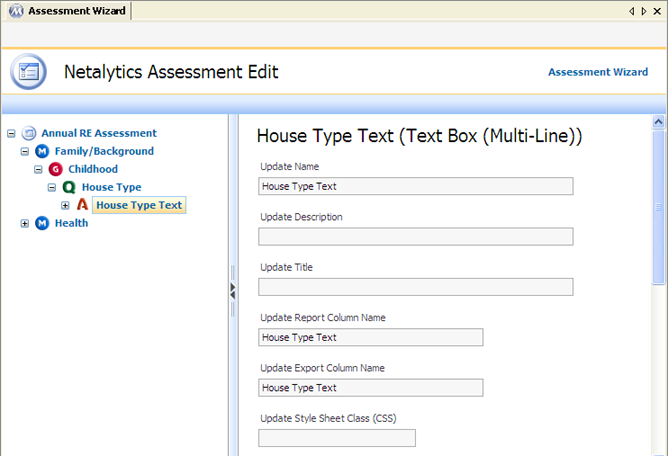
Response Item Field Descriptions
Update (Response Item) Name
This field is used for entering the name of the response item.
Update (Response Item) Description
This field is used for entering a short description of the response item.
Update (Response Item) Title
This field is used for entering the text that will appear on the assessment adjacent to the response item.
Update (Response Item) Report Column Name
This field is used for entering the name of report column associated with the response item.
Update (Response Item) Export Column Name
This field is used for entering the name of column associated with the response item when assessment results are exported.
Update (Response Item) Style Sheet Class (CSS)
This field is used for defining the style sheet file to be used for formatting the response item. Response items use the default style sheet formatting unless a different style sheet is specified here.
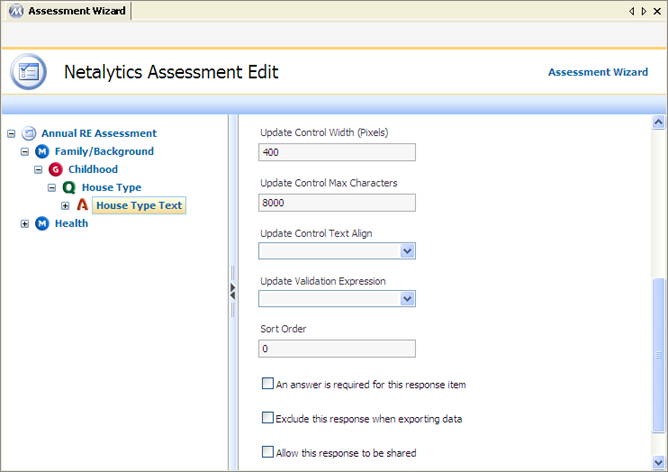
Update (Response Item) Control Width (Pixels)
This field is used for customizing the size of the control/field used for the response item, in pixels. Increasing this value will increase the width of the control on the assessment.
Update (Response Item) Control Max Characters
This field is used for defining the maximum number of characters a user will be allowed to enter in the response item control/field. Increasing this value allows more characters to be entered in this field on the assessment.
Update (Response Item) Control Text Align
This field is used for selecting the alignment of the entered text within the control/field, either 'Left' or 'Right'. 'Left' is generally selected here, but selecting 'Right' will align entered text on the right side of the control/field.
Update (Response Item) Validation Expression
This field is used for selecting a validation expression to control the format and quantity of data being entered in the response item control/field. Available selections include 'Date', 'SSN', 'Currency', 'Time', and 'Zip Code' among others, each programmed to ensure the data being entered matches the format being validated.
Update (Response Item) Sort Order
This field is used to change the sort order of the response item. By default this value is set to '0', and response items are placed in the order in which they are created. Response items can be re-arranged by changing this value to '1' or higher, causing them to be sorted in ascending order.
An answer is required for this response item
This field is used to require a response to be entered in the response item control/field when the assessment is administered. If this checkbox is checked, users will be unable to proceed to the next module of the assessment until a response has been entered.
Exclude this response when exporting data
This field determines whether or not data entered in the response item control/field will be exported when a user export's the assessment's data. If this checkbox is checked the response item's entered data will not be exported (unless the 'Include all responses.' option is checked when exporting results, which overrides this setting).
Allow this response to be shared
This field determines whether or not the response item will be available for selection under the 'Select an existing response(s)' field when creating responses for other assessments. If response items are shared with other assessments, then permanently deleting the response item will delete it from all assessments sharing it.
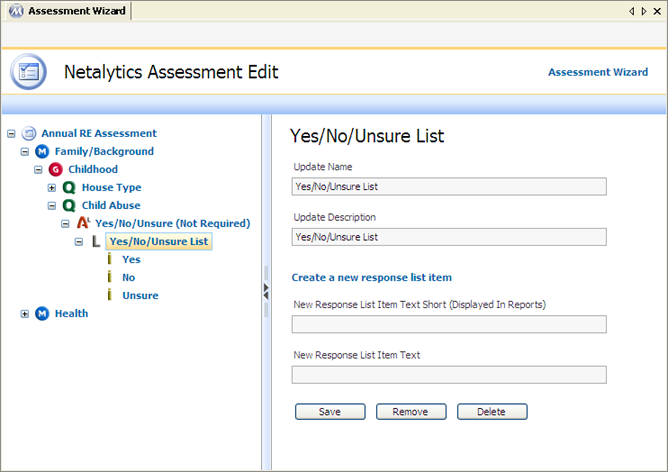
Response List Field Descriptions
Update (Response List) Name
This field is used for entering the name of the response list.
Update (Response List) Description
This field is used for entering a short description of the response list.
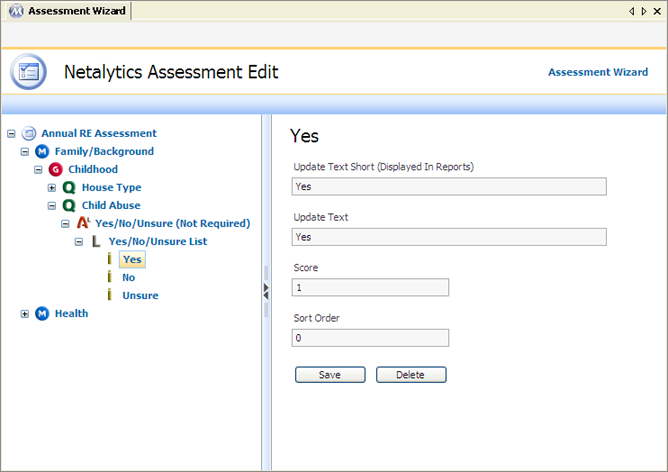
Response List Item Field Descriptions
Update (Response List Item) Text Short (Displayed in Reports)
This field is used for entering the text/name of the response list item as it will appear on assessment reports.
Update (Response List Item) Text
This field is used for entering the text/name of the response list item as it will appear on the assessment form.
Update (Response List Item) Score
This field is used for entering a numerical scoring value for the response list item. Scoring values are used when assessments are scored using the Scoring button on the Patient Assessments or Clinic Assessments screens. Scoring values can also be included on exported result XLS files by checking the 'Include list item Scoring Values' checkbox when exporting.
Update (Question Group) Sort Order
This field is used to change the sort order of the response list item. By default this value is set to '0', and response list items are placed in the order in which they are created. Response list items can be re-arranged by changing this value to '1' or higher, causing them to be sorted in ascending order.
Assessment Wizard - Command Buttons
Next
This button is used to navigate through different screens on the Assessment Wizard. After entering all necessary data, pressing this button opens the next screen for continuing with the next step.
Previous
This button is used to navigate backwards through different screens on the Assessment Wizard. Pressing this button allows users to open previous screens before continuing with the next step.
edit
This button appears beside each existing assessment on the 'Edit, delete, or export an existing Assessment' screen. Pressing this button will open the adjacent assessment for editing.
delete (Assessment)
This button appears beside each existing assessment on the 'Edit, delete, or export an existing Assessment' screen. Pressing this button will open a confirmation message confirming you want to delete the adjacent assessment. Pressing OK on this message then deletes the assessment. This button becomes disabled when at least one instance of the adjacent assessment has been saved, and will only be re-enabled if all saved instances of the assessment are deleted.
export
This button appears beside each existing assessment on the 'Edit, delete, or export an existing Assessment' screen. Pressing this button will open the File Download window, with options for opening or saving the exported XML document.
Assessment Wizard
This button appears on the upper right-hand corner of many different assessment wizard screens. Pressing this button will return users to the assessment wizard home page, shown in the first screen shot of this topic.
Save
This button appears on numerous pages of the assessment wizard screens. Pressing this button saves data entered or edited for assessment items, and is also used to download XML and/or XLS files when exporting assessments and assessment results.
Browse
This button appears on the 'Select an Assessment XML file for import' page of the assessment wizard. Pressing this button will open a Choose File window, for selecting the XML file to import.
Deactivate Assessment
This button appears at the bottom of the Netalytics Assessment Edit page of the assessment wizard when the assessment is selected on the treeview pane on the left-hand side. Pressing this button will deactivate the selected assessment, making it unavailable for use on the Patient Assessments or Clinic Assessments screens.
Remove (Assessment Item)
This button appears at the bottom of the Netalytics Assessment Edit page of the assessment wizard when various assessment response items are selected on the treeview pane on the left-hand side. Pressing this button will remove the selected item from the assessment.
Delete (Assessment Item)
This button appears at the bottom of the Netalytics Assessment Edit page of the assessment wizard when various assessment response items are selected on the treeview pane on the left-hand side. Pressing this button will not only remove the selected item from the assessment, but also delete the selected item from the list of existing responses available.
![]() (Calendar)
(Calendar)
This button appears in the 'Select export filter criteria (Optional)' section of the 'Select an Assessment for export' page of the assessment wizard. Pressing this button will bring up calendar control for selecting dates in the criteria fields.