![]()
![]()
(Topic Last Updated On: 02/22/2018)
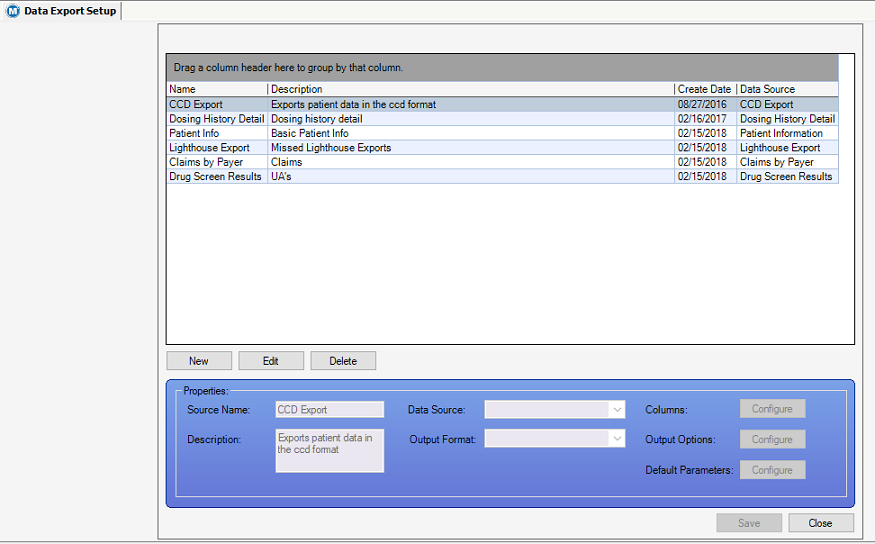
Administration > Data Export Setup
The Data Export Setup screen can be accessed from the Administration menu. From this screen users have the ability to create data export source types from a system coded list. Users have the ability to customise columns, output formatting, and default parameters for some source types. Other source types are configured to meet an industry standard format, and do not allow for customization. A basic knowledge of Excel and data export formatting is helpful when using this screen.
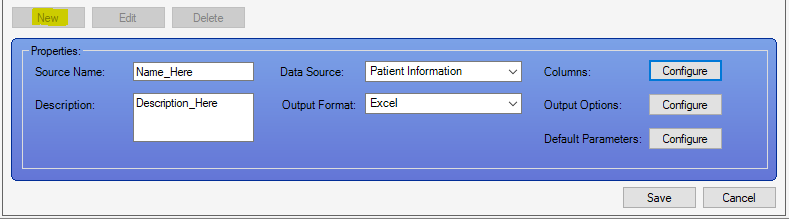
Source Name
This field shows the name of the data export source.
Data Source
This dropdown menu is a system coded list of available data source types.
Columns
If the selected data source allows, the configure button to the right of Columns will be clickable.
Output Options
If the selected data source allows, the configure button to the right of Output Options will be clickable.
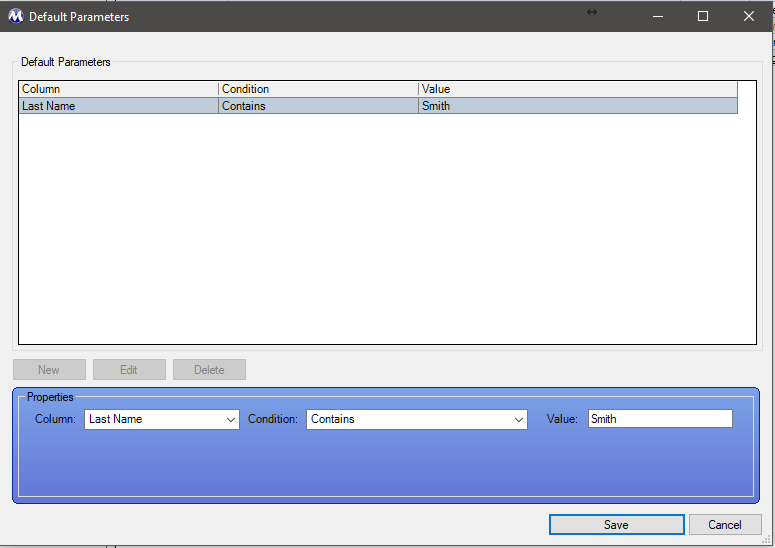
Default Parameters
Clicking the configure button here allows the user to customize the default filter properties of the data export.
Description
This field contains a brief description of the data export source.
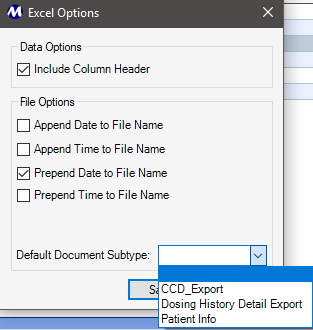
Output Format
The dropdown menu here contains two options. 'Delimited' or 'Excel'. This selection will dictate the file format of the export.
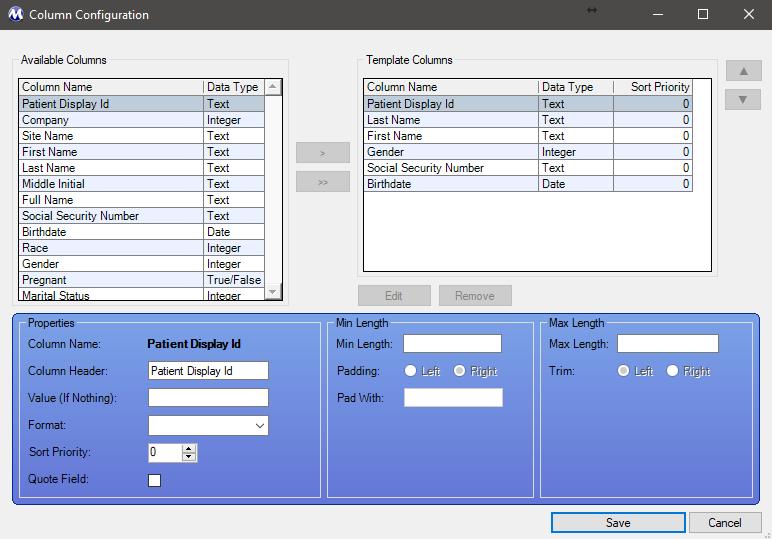
Available Columns
Found in the Properties section of the Column Configuration pop-up dialog box, this is a collection of all available columns that can be used when customizing the data export source.
Template Columns
Found in the Properties section of the Column Configuration pop-up dialog box, this list displays the selected columns that will be used in the data export when creating a new export source.
Column Name
Found in the Properties section of the Column Configuration pop-up dialog box, this is the system given name of the column selected.
Column Header
Found in the Properties section of the Column Configuration pop-up dialog box, this column name is system defined, but can be customized for the data export source. The column name in this field is how that column header will display in the export.
Value (if Nothing)
Found in the Properties section of the Column Configuration pop-up dialog box, this field is blank by default. Users can enter a text to display in that field if there is no data for that column type for the specific patient. (ie. Enter 'N/A' to display in the export file if the patient does not have any data for the column selected.)
Format
Found in the Properties section of the Column Configuration pop-up dialog box, this dropdown menu contains column specific formatting options.
Sort Priority
Found in the Properties section of the Column Configuration pop-up dialog box, this is a numbered sort priority field allowing the user to set the display order for the selected columns. By default, all columns are set to '0'.
Quote Field
Found in the Properties section of the Column Configuration pop-up dialog box, when this checkbox option is checked, it places quotes (" ") around the data in that column.
Min Length
Found in the Min Length section of the Column Configuration pop-up dialog box, users can enter the minimum length value of the data to display in the selected column.
Padding
Found in the Min Length section of the Column Configuration pop-up dialog box. Users can choose to which side of the data, 'Left' or 'Right', to add additional characters when the data does not meet the minimum length value.
Pad With
Found in the Min Length section of the Column Configuration pop-up dialog box, enter the character to be used when the data requires padding. (ie. #, 0, X)
Max Length
Found under the Max Length section of the Column Configuration pop-up dialog box, users can enter the maximum length value of the data displayed in the selected column.
Trim
Found under the Max Length section of the Column Configuration pop-up dialog box, select the radio-button option to trim the data to the 'Left' or 'Right' to meet the maximum length value for that column.
Name
This column displays the user entered source name for the data export source type.
Description
This column displays the user entered description for the data export source type.
Create Date
This is the date the data export source type was created.
Data Source
This column displays the data source type.
Column Name
Found in the Column Configuration pop-up dialog box, it displays the name of the column.
Data Type
Found in the Column Configuration pop-up dialog box, this column displays how the data will display in the export. Data types include: Integer, Text, Date, and True/False.
Sort Priority
Found under the Template Columns section in the Column Configuration pop-up dialog box. This column shows the sort order of how the columns will display in the export. By default, all columns are set to '0'. With all sort priorities being set to '0', the columns will display in the top-to-bottom order as they show in the Template Columns section.
New
Pressing this button makes the data export properties accessible, allowing the user to create a new data export source type.
Edit
After selecting an existing data export source type from the grid, pressing this button will allow the user to make changes to the properties and configurations of that source.
Delete
After selecting an existing data export source from the grid, pressing this button will permanently delete that source.
Configure
There are 3 different instances of this button: Columns, Output Options, and Default Parameters. Depending on the data export source selected, the configure button will be clickable or grayed out. See the procedures section below on 'How To Configure Columns and Output Options'.
Save
Clicking this button will save new or edited data export source type changes.
Close
This button closes the data export setup screen.
Save and Close
Found in the Column Configuration and Default Parameters pop-up dialog box. This key is used to apply changes made to the data export source and closes the pop-up dialog box.
Create Document Subtypes First
Document subtypes must be created before they can be set as a default document subtype output option. Document subtypes are created using the Administration > Document Setup screen. From that screen, choose the Document Type of 'Data Exports', and add the needed subtypes under that category.
Industry Standard Export Source Types
There are some data source options in the list that are configured using an industry standard format. These options will not have the ability to customize the column configurations. Examples of these options are: CCD Export, Illinois DARTS exports, Lighthouse Export, and Nevada TEDS Extract.
 moves
the selected column from the Available list to the Template Columns
list. Repeat these steps for all columns that need to be included
in the export.
moves
the selected column from the Available list to the Template Columns
list. Repeat these steps for all columns that need to be included
in the export.  to move the selected column up or down in the list. Repeat these
steps for all columns that need to be repositioned. Alternatively,
a sort priority can be assigned to each column.
to move the selected column up or down in the list. Repeat these
steps for all columns that need to be repositioned. Alternatively,
a sort priority can be assigned to each column.